Monday, May 31, 2010

2 Cards for H2H9 Challenge - A Sketch

Welcome here, the challenge this week over at Heart 2 Heart Challenges is a Sketch.

The first card I created, I stayed very true to the sketch, while the second card I made, I took some liberties with it.
.
Card Size: 4.25" x 5.5"
.
I was wanting to use some new paper I got, Passages. I had planned on using more on my card, but ended up just using the one pattern. I also wanted to embellish my card with pearls, but I only had white, so I coloured them with Copic E33 and they blend in really nice.

.
Recipe: CTMH PP-Passages, CTMH CS-Chocolate, Barn Red, Creme Brulee & Colonial White, CTMH Ink-Black & Chocolate, CTMH SS-Live Inspired, Martha Stewart Layered Arches & Gothic Arches Corner Punch, Nestabilities-Labels Eight, Labels Four & Fancy Tags, Pearls, Foam Squares, Ribbon, Copics W-1 & E33.
.
Card Size: 5" x 5"
.
.
For this card, I used the sketch and tried to think out-of-the-box a little. The star I embossed with clear embossing powder and Prisma Glitter, and the arrow is embossed with just the clear embossing powder. I also used Foam Squares behind the one end of the arrow, which you can see better in the photo below.
.

Recipe: CTMH PP-Stardust, CTMH CS-Moonstruck, White Daisy & Honey, CTMH Ink-Topiary, Moonstruck, Black & Honey, CTMH SS-Shining Star, Star Struck & Cupcake Sprinkles, Versamark, Clear Embossing Powder, Prisma Glitter, Ribbon, Foam Squares, Rhinestones.
.
Don't forget to check out the other samples from the H2H Design Team to help inspire you, and then link up so we can see your creation!
.
Enjoy,
Deneen

Monday, May 24, 2010

Background Challenge for Heart 2 Heart

Good morning! As you may know, I was asked to be the first Guest DT member over on Heart 2 Heart Challenges. (You can read about it HERE.) Today is the first of two challenges that I will be sharing my creations with you, to help inspired you for the challenge.

.
This week the challenge is: Stamp Your Own Background.
.
For this challenge, I created the paper below using CTMH stamps and CTMH Ink.
I started with an 8.5" x 11" piece of White Daisy CS, and stamped the large swirly flower (from the Summer Wishes SS) with Versamark, and then embossed it with clear embossing powder. I then sponged Lilac Mist Ink over top the embossing, and then wiped the embossed flower to remove any ink that covered it. (I wanted the ink to colour the CS, not the embossing). I then stamped the leaf (with Juniper), the medium sized flower (with Pansy Purple), the small flower (with Blush), and the dots (with Spring Iris). I sponged Creme Brulee ink over the purple flowers, and sponged anything not yet inked, with Petal ink.
.
Recipe: CTMH CS-White Daisy, CTMH Ink-Petal, Juniper, Creme Brulee, Spring Iris, Lilac Mist & Blush, CTMH SS-Summer Wishes & Serendipity, Versamark, Clear Embossing Powder.
.
Now, on to the card I created using my own designer paper:) Card size: 4.25" x 5.5"
I stamped the flower used in the image with Pansy Purple, then clear embossed it, and cut it out. I then attached it with Foam Squares. Of course I had to use one of my new Martha Stewart punches:), and I finished it off with some organdy ribbon and purple rhinestones.
.
Recipe: CTMH CS-Pansy Purple & White Daisy, CTMH Ink-Pansy Purple, Black & Juniper, CTMH SS-Summer Wishes, Martha Stewart Scroll Lace Edge Punch, Rhinestones, Foam Squares, Organdy Ribbon, Versamark, Clear Embossing Powder, Button.
.
So, then I got nervous...because ya know, as a Guest DT Member, people will be looking at my creation to inspire them. I thought, "Maybe this card is too busy by using such a big piece of my Background paper...what if people think 'Yuck'?" So, just before I sent it off to Mary, I ran back to my desk and came up with another card. I thought I would let her choose which one was better. I didn't want anyone to be disappointed with the first Guest DT Member, lol!
Card Size: 4.25" x 5.5"
.
There isn't much to say about this card, it is pretty straight forward. Used my new punch again:)
.
Recipe: CTMH CS-White Daisy, Pansy Purple, Spring Iris & Juniper, CTMH Ink-Pansy Purple, Spring Iris, Desert Sand, Lilac Mist & Black, CTMH SS-You Are Beautiful, Argyle Backgrounds & Say It In Style, Martha Stewart Scroll Lace Edge Punch, Nestabilities Oval & Scalloped Oval, Pearls, CTMH Juniper Grosgrain Ribbon, Foam Squares.
.
If you'd like to join in the challenge, head on over to Heart 2 Heart Challenges and check it out!
.
Enjoy,
Deneen

Thursday, May 20, 2010

Thomas Kincade Card

I was asked to make a card for a friend at work who is going through a difficult time. I thought this Thomas Kincade scene was the perfect fit, quiet and peaceful.
.
Card Size: 5" x 7"
.
I think I used every Copic I owned, lol:) I was very happy with how it turned out. For the sentiment inside the card, I attached it towards the top of the card so that there was more room for all of us to write a little something.
Recipe: CTMH CS-White Daisy, Garden Green, New England Ivy, Colonial White & Desert Sand, CTMH Ink-New England Ivy, Garden Green & Desert Sand, CTMH SS-Live Inspired & Comforting Thoughts, Thomas Kincade Stamp-Make A Wish Cottage, Nestabilities-Fancy Tags, Martha Stewart Pinking Scallop Border Punch, Foam Squares, Pearls, CTMH Satin Edge Colonial White Organdy Ribbon.
Enjoy,
Deneen

Monday, May 17, 2010

You Are Beautiful Card - H2H #7

Happy Monday! Today Heart 2 Heart Challenges posted their next challenge (H2H #7), and it's a colour challenge!
.
.
Card Size: 4.25" x 5.5"
.
I procrastinated with this challenge because I have a hard time with colour challenges. Once I started working with the colours, I was inspired, and this is the card that I came up with. I really love how the Ocean colour 'pops' off the card.
.
I stamped the flower in Desert Sand, and then stamped the flower with 2nd generation Ocean. I then used my CTMH blending pen to add some dimension to the flower and buds. I finished off the image by stipple brushing Desert Sand around the edge. Of course I had to use my new Martha Stewart Punch (that my hubby so generously got me for my birthday).
.
Recipe: CTMH CS-White Daisy, Desert Sand, Topiary & Cocoa, CTMH Ink-Ocean, Desert Sand & Black, CTMH SS-You Are Beautiful & Live Inspired, Martha Stewart Woodland Branch Corner & Edge Punch, Foam Squares, CTMH Blending Pen, Satin Ribbon, Pearls.
.
Make sure to pop on over to H2H Challenges and check out what everyone else has done with this weeks colour challenge.
.
.
.
On a personal note:
For those of you who have asked how my blue streak looks (which I got because I turned 40 on Mother's Day and had to do something crazy), I took some pictures.
Without blue streak (I didn't know if I should smile or not...I look so serious, lol.).
With blue streak...it's hard to see in this shot (thought I should smile this time around:))
.
Did you miss me (or at least a post from me...lol) last Thursday. Weeeelllllll, let me tell you, "HE CAN BE TAUGHT!!!" My hubby, after 15 years of marriage, surprised me with a romantic get-away-from-the-kids weekend....also a birthday gift. He was so sweet, treated me like a queen the whole weekend...I didn't lift a finger. The cottage we were in had a jacuzzi, a fireplace, a sauna shower, a theatre room, and it even had a dishwasher (which I didn't use, but hubby did). I just want to give my hubby a BIG thank-you. THANKS honey, I love you!!
.
Enjoy,
Deneen

Monday, May 10, 2010

H2H Challenge - Techniques

Good morning! This is my second post for today, my first post was about a Prize Pack you could win over at Heart 2 Heart Challenges....you can find the first post HERE.

This is my entry for H2H Challenges this week. We needed to showcase a technique. I think I've used a few different techniques, 'cause I'm not sure what one may call a technique. So one of these should qualify me for the Challenge, lol.

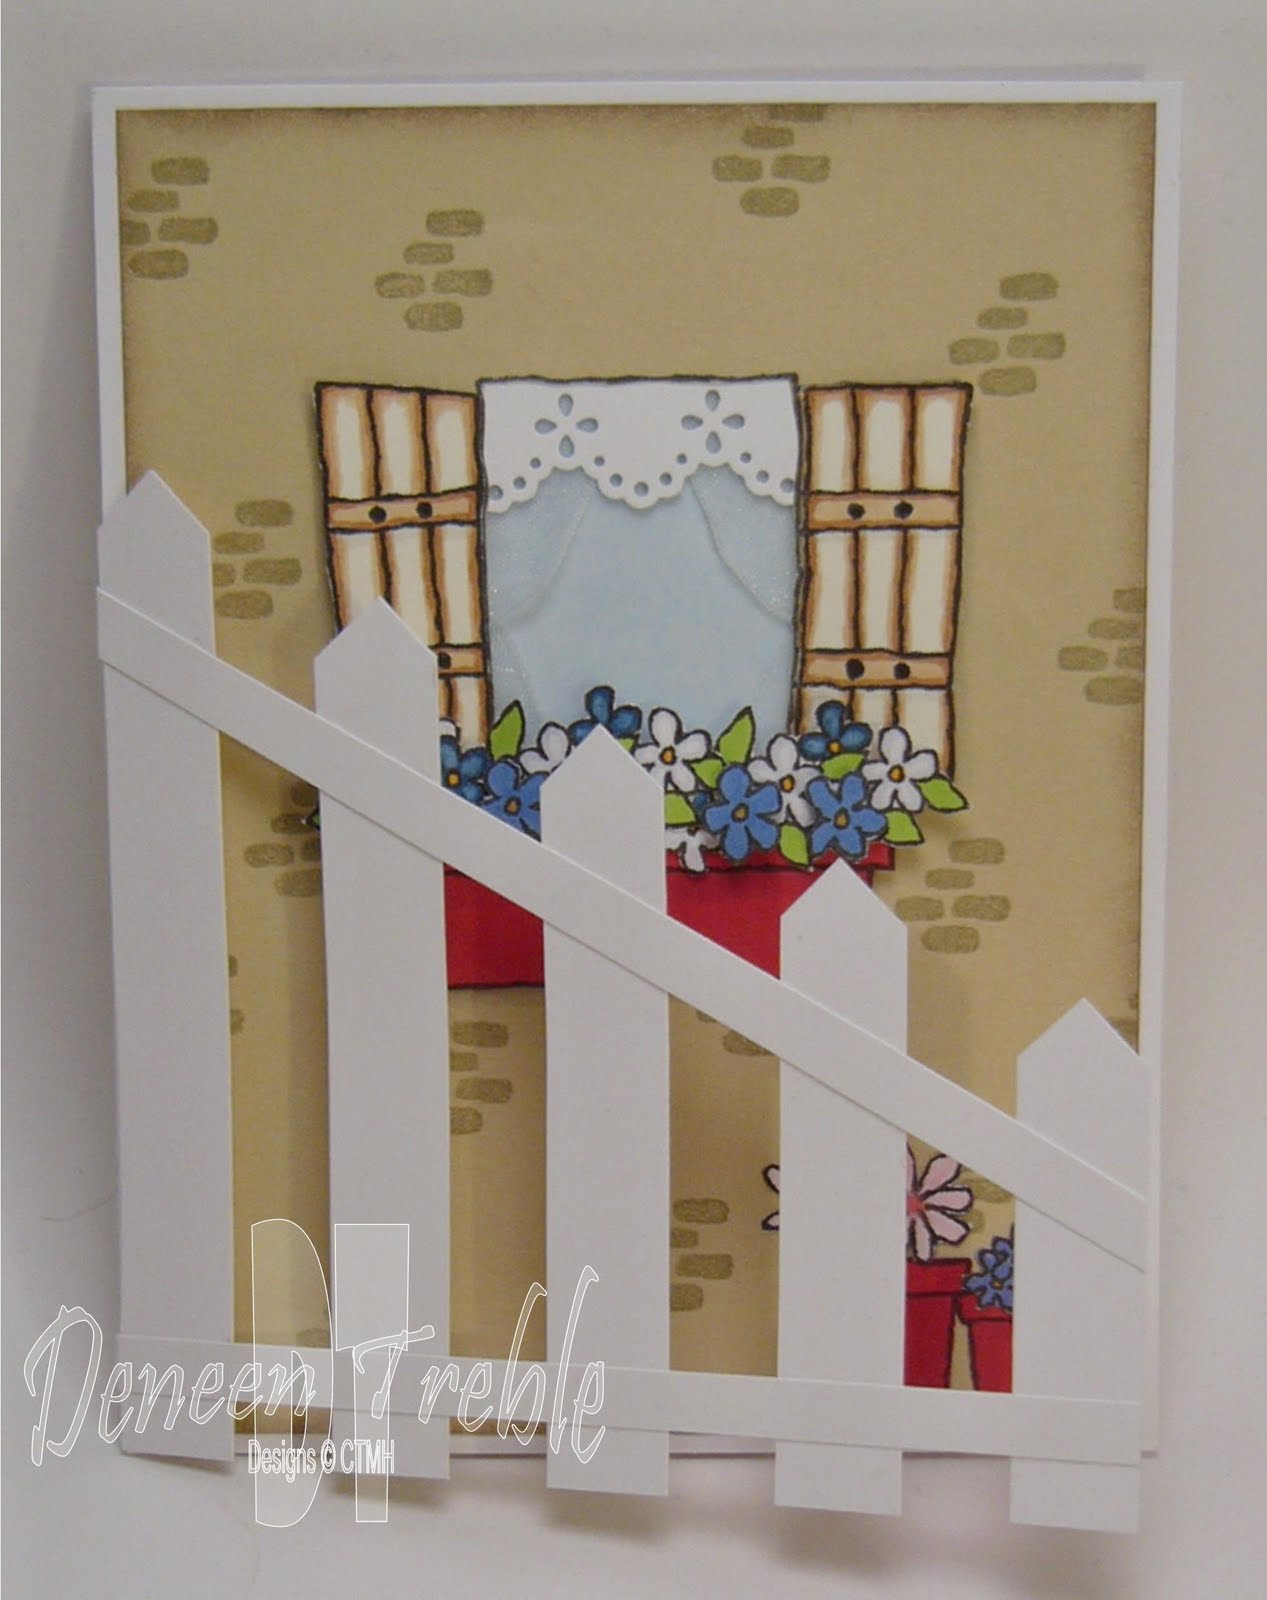
The Technique that I am showcasing here is....colouring on vellum.
To colour on vellum:
1. Stamp your image on vellum, and let dry.
2. Turn the image over, and colour on the back....it gives it a nice soft look, and doesn't interfere with the black ink.
3. Enjoy your colouring skills:)

That's all there is to colouring on vellum. I used CTMH Markers for my sample, and I finished off the image by adding White Daisy Marker (on the water) to the FRONT of the image, otherwise you won't see it on the back.

Card Size: 4.25" x 5.5"
Another Technique I used is....making a window in your card.
To make a window:
1. Add needed CS to the front of your card base...as few layers as possible.
2. Choose your shape (I used Nestabilities Labels ) and send through your machine (I used a Cuttlebug).
3. You now have a window in the front of your card base, ready to attach a piece of vellum to.
4. Be sure your vellum image is cut 1 size BIGGER than the window shape, or you won't be able to attach the vellum to the card....let me tell ya, I learned the hard way?

Here's a shot of the light shining through my window, and the vellum I attached.
Another Technique I used was....making a frame for my image.
To make a frame:
1. Choose what shape you want...I used Nestabilities Labels 4.
2. Choose a size that will frame your image nicely.
3. Select the next size up as well.
4. Center the smaller shape insided the larger shape.
5. Send through your machine (I use a Cuttlebug), with your desired piece of CS.
6. Send through your machine again, to emboss the edges.
7. You now have a frame for your image.
8. I attached my frame with Foam Squares....the vellum image is attached directly to the card front, with the frame on top of it.
Here's a picture of the 2 Nestabilites that will make my frame.
Another Technique I used....Paper Piercing.
To Paper Pierce:
1. Choose the area on your card front you want pierced....it is better if you know BEFORE you attach your CS to your card front, otherwise you will see the holes inside the card (did you notice that I didn't pierce mine BEFORE I attached my CS...the light is shining through the holes...I would correct that for my next card).
2. I use a piece of plastic canvas (I think that's what it's called), to make my holes evenly spaced.
3. Pierce the number of holes you want (at the same place in each hole so that they will be evenly spaced).
4. Move your plastic canvas to the next area, and repeat the same design...I pierced 6 holes across the top, and 4 down the sides.

Here's the piece of plastic canvas I use. (I cut off a small edge section of the plastic, for when I go around curves...I'll have to do a tutorial on how to do that, another time)
Those are just a few of the Techniques I used for creating this card. I hope you enjoyed learning about them. Now you can try a few out, if you didn't know how before.
Recipe: CTMH CS- Garden Green, New England Ivy & Bamboo, CTMH Ink-Olive, New England Ivy, Cocoa, Grey Wool, Desert Sand, Heavenly Blue, Dutch Blue, Indian Corn Blue, White Daisy & Chocolate, CTMH SS-Beautiful Things & Weathered Backgrounds, Martha Stewart Layered Arches Punch, Foam Squares, Nestabilities Labels 4, Tan Grosgrain Ribbon, Vellum, Piercing Tool.
Don't forget to head over to Heart 2 Heart Challenges and see what other Techniques people are using!
Enjoy,
Deneen

Heart 2 Heart Challenges Sponsor

Happy Monday to you all! Not only am I Guest DT Member for May, but I also just happen to be the Sponsor for this week's Prize Pack over on Heart 2 Heart Challenges.

Also, thank-you for the wonderful Birthday Wishes I received...it was a great day. Martha Stewart was very kind to me, lol...my hubby bought me some new punches, ones I hadn't even seen before!!! And yes, I did get a blue streak in my hair...but it is almost washed out, and looks green, {sigh} I'm stopping by the hair salon after work to ask what happened, and hopefully they'll fix it...if not, maybe I'll go with red:)

So, back to the Prize Pack for this week. {In my best announcer's voice} Here are some of the goodies you could win!
  • *14 handmade cards...by moi!
  • *2 castle cards, all ready for embellishment.
  • *A stationary box, also made by me, and made just for this prize...it's a one-of-a-kind.
  • *A big, huge bag of Clodhoppers...ya gotta keep your energy up dontcha know:)
  • *And of course I'll throw a few more other little goodies in the box before I send it off to you.
And how, you ask, do you get the chance to possibly win this prize pack? Well, I will gladly tell you:
  1. 1. Head on over to Heart 2 Heart Challenges and follow the challenge of the week...which just happens to be a Technique Challenge, you'll see the DT creations posted there, and the specifics of the challenge,
  2. 2. Post your results to your personal blog, or other online gallery,
  3. 3. Return to the H2H blog, and use Mister Linky (scroll to the bottom of the challenge post HERE), and link directly to your creation,
  4. 4. Don't forget! You need to use CTMH products, but your project does not have to be 100% CTMH.

The following week, a winner will be chosen (by Random.org) from all the entries....and it could be YOU!!!!!

Before you head off to create, here's some shots of the Stationary Box, and the big, huge bag of Clodhoppers!


The instructions for the Stationary Box can be found HERE.
I'm so excited to see what techniques everyone has to share this week! Now you can run, don't walk, over to Heart 2 Heart Challenges!
Enjoy,
Deneen

Wednesday, May 05, 2010

Cards With A Gate That Opens, w/ Tutorial!

Wow! What an exciting week for me, if you haven't heard me whooping and hollering from Manitoba yet, I was chosen as Guest Designer over on the Heart 2 Heart Challenges blog! I posted about it yesterday HERE!

And in celebration, I whipped up these cute cards to share with you...........ahhhh, ya caught me, lol, I'm not quite THAT good. But I am really excited to share these cards with you...I haven't shared a tutorial with you in a while, and thought it was about time.

So without further ado, here are these cute, cute, cute cards that feature a gate on the front!!! The tutorial for how to make them is at the bottom of the post, so be sure to scroll down. Oops, almost forgot to mention that the idea for this came from a site called B craft E, they sell templates...only in the UK.

All card sizes: 4.25" x 5.5" ....it was difficult to stop at one, so many options with this card!

Card #1: Welcome to my house!

Aren't ya just tickled pink with the possibilities! The gate does lie flat on the card, but to photograph it standing up, the gate wanted to swing open a little.


I did some paper piecing with the CTMH SS Around the Block, sponged the clouds for the sky, used CTMH B&T paper for the hills, and finished it off with a tree from CTMH SS Four Seasons.


Recipe: CTMH PP-Evensong, CTMH CS-White Daisy, Olive, Tulip, Buttercup & Cocoa, CTMH Ink-Black, Crystal Blue, Bamboo, Garden Green & Outdoor Denim, CTMH SS-True Friends, Around the Block, Four Seasons, Foam Squares, Copics, Martha Stewart Grass Punch.


Card #2: Nestled in the woods.

I wanted to show that you can use the gate in the other direction. You could extend the gate a little...because it doesn't quite reach across the whole card. The white gate seems a little stark against the cottage, but I love the look of a fresh white fence/gate. I think I may distress the edges a little next time.


Recipe: CTMH CS-Smokey Plum, Grey Flannel & White Daisy, CTMH Ink-Black, Cocoa & Desert Sand, CTMH SS-Live Inspired, Thomas Kincade Make A Wish Cottage, Copics (too many to name)
Card #3: At the farm.


I used CTMH SS Weathered Backgrounds on Bamboo CS, because not all fences are white. My daughter loves horses, so I borrowed her stamp set.

Recipe: CTMH CS-Chocolate, White Daisy & Bamboo, CTMH Ink-Chocolate, Black, Olive & Crystal Blue, CTMH SS-Beautiful Things, Racoon & Friends, Foam Squares, Copics, Liquid Glass. The horse SS I'm not sure where it is from, my daughter didn't keep the packaging.
Card #4: Welcome here!
Recipe: CTMH CS-Bamboo, Tulip, Colonial White & White Daisy, CTMH Ink-Black, Desert Sand & Outdoor Denim, CTMH SS-Flower Pot & Around the Block, Foam Squares, Martha Stewart Eyelet Lace Punch, Copics, White Organdy Ribbon, Vellum.


Gate Tutorial:
Step 1:
I forgot to mention that I made the picket is made by cutting off the corner, I measured 1/4" down each side and cut from that mark to the middle of the top of the picket piece. Hope this is making sense.

Step 2:


Step 3:
Step 4:

Step 5:


Step 6:


Step 7:
Hope you enjoyed, and are inspired by the cards today!
Deneen
{Edited}
I just saw an awesome card using this template! Go check out Melanie's card, she made a fence with barbed wire, totally awesome.

Guest Designer for Heart 2 Heart Challenges Blog

Good morning!!! I'm so excited to announce that I've been chosen as Guest Designer over on the Heart 2 Heart Challenges Blog.

If you {heart} Close To My Heart (CTMH), then this challenge blog is for you! There will be a variety of challenges posted and CTMH products are required to enter. It's sponsored and created by CTMH Independant Consultants! It's just full of great creations using CTMH products. Don't have any CTMH products, that's okay, head on over and be inspired....you may find yourself looking for a Consultant near you!!!

Thanks again for the honour of being chosen as Guest Designer (if you're just dying to know a little more about me, just clink on the link :) ) Be sure to look up the bio's, and check out the blogs, of the very talented and creative Design Team over on H2H Challenges!

Thanks again,
Deneen

Monday, May 03, 2010

Mother's Day Card

Well this is perfect timing. Over on Heart 2 Heart Challenges, the challenge this week is cards...or other projects...for Mother's Day. And that's exactly what I was going to post!! Some ladies at work were wanting a Mother's Day card, and this was one of a couple that made.

Card Size: 4.25" x 5.5"

The reason I didn't specifically put Happy Mother's Day on it is because I wanted the option of using it after Mother's Day....especially because I was making up several like this and I didn't want to keep them until next Mother's Day.
I finished it off with Cherry Ice Stickles...which didn't photograph too well. I'll try and see if I can upload a picture of the Stickles shimmeryness later :)
Recipe: CTMH CS-Petal, White Daisy, Spring Iris & Petal, CTMH Ink-Spring Iris, Black, Olive, Pansy Purple, Petal & Bamboo, CTMH SS-Sweet Flowers, Say It In Style & Key To My Heart, Nestabilities-Scalloped Oval, Oval & Double Ended Tags, Foam Squares, Pearls, Ribbon, Cherry Ice Stickles.
To see more Mother's Day creations, or past challenges, pop on over to Heart 2 Heart Challenges!
Enjoy,
Deneen

LinkWithin

Related Posts with Thumbnails