Monday, June 29, 2009

Notebook With Pen Holder

I altered this notebook as a Teacher Thank-you gift. I used grosgrain ribbon as a pen holder because I find it frustrating when I can't find a pen...lol. I explain how I altered this notebook below.


Cover the spine with patterned paper.

Attach the ribbon--I used Liquid Glass. I made sure to cut it quite long so that it won't get pulled out with constant use.
Cover 2 pieces of CS cut to the same size as the notebook.

Here are the pieces ready to assemble. Glue 1 covered CS piece on the front, and 1 on the back (to cover the ribbon).
And that's it, you're all done, nice and simple.

Here's a shot of the inside front cover. If you follow my blog, you know that I like to wrap my patterned paper around the edges, and then finish it off with another piece of CS.
Recipe: CTMH Level 2 Paper-That's Amore, CTMH CS-Vanilla Cream, Black & Tulip, CTMH Ink-Tulip & Black, CTMH SS-Treasure Life, Nestabilities Oval, Prima Flowers, Rhinestone Brad, Liquid Glass, 3D Foam Squares.
Enjoy,
Deneen


Friday, June 26, 2009

Just A Simple Card

When I make cards with the Cuttlebug EF's, I hate to cover up the embossing. As a result, I tend to lean towards a simple, elegant look.

I used the Textile EF for the main body of the card. The border is done using the Frills EF. I stamped the smaller flowers using the 2nd Generation stamping method (ink up your stamp, then stamp it on a scrap piece of paper, now take the stamp and stamp on your project.) I finished the image by using the stipple brush around the edges.

Card Size: 4 1/4" x 5 1/2"


I changed this card up by making it with the fold on the top.


Here's how I used my Nestability as a mask...I stipple brushed around the edge, then when I remove the Nestability, the outer edge remains uninked.


Recipe: CTMH CS-Tulip, Creme Brulee & Vanilla Cream, CTMH Ink-Tulip, CTMH SS-Treasure Life, Cuttlebug EF-Textile & Frills, Clear Rhinestones, 3D Foam Squares.

Enjoy,
Deneen

Wednesday, June 24, 2009

Be Yourself...Again

I wanted to use a different colour scheme with the stamp set Be Yourself (see post from June 22 '09), and here is the result: Card Size: 4 1/4" x 5 1/2"

I used the Textile EF from Cuttlebug for the background. Added some Prima Flowers, and used Prisma Glitter around 'ONE of a kind' to make it look like it's surrounded with lights.Here's a close-up of the Prisma Glitter sparkling away: Recipe: CTMH CS-Spring Iris, Pansy Purple, Black & White Daisy, CTMH Ink-Black & Pansy Purple, CTMH SS-Be Yourself & Annotations, Cuttlebug EF-Textile, Prisma Glitter, Rhinestone Brad, Prima Flowers, 3D Foam Squares.

Enjoy,
Deneen

Monday, June 22, 2009

Be Yourself

I finally had some time to play around with my new stamp set from CTMH called Be Yourself. When I stamp, I usually make at least 5 cards so that I have them on hand when I need them...and my mom comes and raids my stash too!I really like how this card turned out. The corners are made from the Cuttlebug Vintage Die, and I tucked a small bit under the corner. I then used 3D Foam Squares to attach the image to the card.
Here's the corner piece, I used the scrap swirl to 'frame' the sentiment on the card.
Card Size: 4 1/4" x 5 1/2"
Recipe: CTMH Level 2 Paper Pack-That's Amore, CTMH CS-Black, White Daisy, Chocolate & Tulip, CTMH Ink-Black & Chocolate, CTMH SS-Be Yourself, Cuttlebug Die-Vintage, 3D Foam Squares.
Enjoy,
Deneen

Friday, June 19, 2009

Celebrate

I had this patterned paper that I've been wanting to use and I finally got around to making it into some cards.
Card Size: 4 1/4" x 5 1/2"I used the Cuttlebug EF Tiny Mosaic on the patterned paper. I added Liquid Glass to the chocolate sprinkles and attached the cupcake using 3D Foam Squares.
Recipe: KI Memories Paper-Disco Fever, CTMH CS-Outdoor Denim, Heavenly Blue, Black & White Daisy, CTMH Ink-Outdoor Denim, Black Heavenly Blue, Buttercup & Cocoa, CTMH SS-Cupcake Sprinkles, Say It In Style, Autumn Splendor & Spot On Backgrounds, EF-Tiny Mosaic, Liquid Glass, Silver Brad, 3D Foam Squares.
Enjoy,
Deneen

Wednesday, June 17, 2009

Blog Award!!!

Wow, how lucky am I, I received 3 blog awards.

Thank-you to:
Paula-Scrap Addicts Attic
Emma H-Paper Addicts Anonymous
&
Kristine-Random Ramblings of a Scramping Addict
(just click on their name to go to their blogs!)

Here's the Award:

The rules for this award are:
1) Accept the award, post it on your blog together with the name of the person who has granted the award, and his or her blog link.
2) Pass the award to 15 other blogs that you’ve newly discovered.
3) Remember to contact the bloggers to let them know they have been chosen for this award.
Here's my list (in no particular order):
Sheila
Laura Petruso
Terri
Shannon Murdock
Tammy
Jen Rubio
Takisha
Leisa Hubley
Mare
Scrappin' Happy
Cathyrn
Lourae
I almost have 15 newly discovered blogs...hope it's okay.
Enjoy,
Deneen

For Dad


When I was working on my Father's Day card last weekend, I couldn't decide which image to use, I ended up using one from the Beautiful Things SS (see June 15 '09 post). But I still wanted to use this lighthouse from the Nantucket Retreat SS. So I decided Dad will get this card for his birthday.

Card Size: 4 1/4" x 5 1/2"


It's not too easy to see, but I wrinkled the Desert Sand CS, then sponge daubed the edges.I added a drop of Liquid Glass for the lighthouse light, then sprinkled Prisma Glitter on it while it was still wet...now it looks like the light is on. I used pencil crayons to colour in the image.
Recipe: CTMH Level 2 Paper-Majestic Blue, CTMH CS-Desert Sand, Cocoa, White Daisy, Heavenly Blue & Black, CTMH Ink-Cocoa, Balck & Bamboo, CTMH SS-Nantucket Retreat, Say It In Style, Black Brads, Prisma Glitter, Liquid Glass, Pencil Crayons, Sandpaper, 3D Foam Squares.
Enjoy,
Deneen

Monday, June 15, 2009

Father's Day Card

Hey!!!!! Did you know that Father's Day is this Sunday? It totally slipped my mind, so I got busy this past weekend.

And here's what I came up with for dad:
I sanded the Outdoor Denim CS, to keep with the rustic look...don'tcha just love white core CS!!! The corner piece is the 'Vintage' Die from Cuttlebug. The tree is attached with 3D Foam Squares.
Card Size: 4 1/4" x 5 1/2"

Recipe: CTMH Level 2 Paper Pack-Rustic Trail, CTMH CS-Outdoor Denim, Garden Green, Black, White Daisy & Grey Wool, CTMH Ink-Black, CTMH SS-Beautiful Things, Vintage Die (Cuttlebug), New England Ivy Bigger Brads, Pencil Crayons, Sandpaper & 3D Foam Squares.

Hope you have a great Father's Day,
Deneen

Thursday, June 11, 2009

Altered Notebook

I tend to hoard my paper, but once I started using the CTMH Serendipity Paper Pack (I used it for a Stationary Box, and cards...see earlier posts in June '09), I couldn't help myself, I wanted to keep creating with it.

I needed a new Notebook and couldn't wait to use the B&T paper to cover it.

Tada!! Here is the final result:

Notebook size: 7 1/4" x 9 1/2". (I found them at the Superstore.)

Instructions:
I unwound the spiral from the book so that I could decorate the cover. And like the Stationary Box I made earlier, I cut my paper 1/2" larger than the cover, on all sides, and wrapped it around the edges and glued it to the inside cover. I then cut a piece of Bamboo coloured B&T paper 1/4" smaller on all sides and glued that on the inside of the cover so that I had a nice and neat finished piece. I then used the CTMH Eyelet Setter to make the holes (I didn't have a hole punch on hand, that made the right sized holes...because using one would be much quicker). I then decorated the front...I kept it fairly simple because I planned to use it and didn't want items to fall off, or get wrinkled, or get flattened. I then wound the spiral back on, and that was it. I had a pretty notebook to carry around.

Here's what the inside of the front cover looks like.

Here's a close-up of the image on the front. (I coloured the image with pencil crayons.)
Recipe: CTMH Paper Pack: Serendipity, CTMH CS-Outdoor Denim, Dutch Blue, Colonial White and White Daisy, CTMH Ink-Black and Outdoor Denim, CTMH SS-Beautiful Things, White Daisy Bigger Brads.

Enjoy,
Deneen

Monday, June 08, 2009

Birthday Girl & Birthday Boy Cards

I needed some little girl and boy birthday cards, so I made up a few of each of these so I had them on hand.

Card size: 4 1/4" x 5 1/2"

This little girl card was inspired by a CTMH Sista, Vicki Wizniuk. I changed a few things to make it my own. I coloured the little girl with pencil crayons, and used CTMH's 3D Foam Squares behind the girl and the 'Happy Birthday'. I finished the card off with pink rhinestones.

Recipe: CTMH Level 2 Paper Pack-Daydream, CTMH CS-White Daisy, Blush & Sweet Leaf, CTMH Ink- Black, CTMH SS-Family Ties-children & Happy Birthday, Hollyhock Ricrac, Pink Rhinestones, 3D Foam Squares, Pencil Crayons.

Here's the boy birthday card that I came up with. The eyes just called out to have googly ones glued onto them. I stamped Happy Birthday on Twill Ribbon and then frayed the ends.
Recipe: CTMH CS-Lilac Mist, Pansy Purple, Sweet Leaf & White Daisy, CTMH Ink-Sweet Leaf, Pansy Purple & New England Ivy, CTMH SS-Fun Times & Happy Birthday, CTMH Twill Ribbon, CTMH New England Ivy Bigger Brad, googly eyes.

Enjoy,
Deneen

Sunday, June 07, 2009

Sketch(S)/Template(T)/Technique(Q)/Challenge(C) Sites

I've put a list of them in the left hand side column. As I find sites that I think would interest you, I'll add them to the list. I labelled them to help you find what you're looking for, ie (S) for sites with sketch's, (T) for sites with templates etc.

If you have any sites for me to check out, just let me know.

Thanks and enjoy,
Deneen

'Poop' Poems & Candy One Liners

You can find a great list of them HERE.

One that she didn't have that goes with the Snowman (mini marshmallows) & Gingerbread Man (gum drops) Poop, is the Reindeer (mini chocolate chips) Poop:


Heard you've been naughty
So here's the scoop,
All you get is...Reindeer Poop!
Enjoy,
Deneen

Thursday, June 04, 2009

Stationary Box - Instructions

I posted this Stationary Box a few days ago. It was from a template site (as soon as I locate it again, I will give them credit) What they didn't have were the measurements. So I came up with some, and would like to share them with you. I also explain how I covered the Stationary Box, to give it a professional finished look.

*Ah ha!!!!, I found the site again.........you can find their template HERE, at Paper Scrapz. And *said sheepishly* it is called a Keepsake Box...not Treasure Box like I thought (I'm only 39 and my memory is already going *sigh*).

The Stationary Box is made from 2 pieces of CS...the 'box' is made from one piece, and the 'cover' which wraps around the box is from the 2nd piece.


'Box' Piece: I cut it from CTMH White Daisy CS (the photo isn't true colour). The dimensions: 8 1/2" x 9 3/4". Piece A
'Cover' Piece: This is also cut from CTMH White Daisy CS. The dimensions: 6 1/2" x 12". Piece BI covered the 'Box' Piece with CTMH Serendipity B&T Paper. I made it 1/2" larger on all sides so that I could wrap it around the CS and give it a nice finished look. Dimensions: 9 1/2" x 10 3/4". Piece C


Because the 'Cover' Piece is already 12" long, I cut 2, 1/2" strips to glue on the back side, to keep the uniformity of the look. (Clear as mud???) Dimensions: 7 1/2" x 12", 2 strips: 1/2" x 6 1/2". Piece D


Now because I wrapped the B&T paper around my 'Box' and 'Cover' base pieces, I wanted to cover the backside to give it a nice finished look (I used the thinner pattern paper for this, not the heavier CS...because eventually this 'sandwich' has to be folded)....these pieces are a 1/2" smaller on all sides than the base CS pieces....The pictures farther down help explain my madness!! Dimensions: 8" x 9 1/4". Piece E

Dimensions: 6" x 11 1/2". Piece F
Okay, now for assembly!!!

This is the 'Box' Piece-Piece A. I Tombowed (is that a word?) the corners, because I did not want the covering pieces to 'bubble' after I glued them on.


Piece A glued on top of Piece C, and the corners cut.

Here I've taken the above photo and folded and glued the edges down. They're wrapped around the 'Box' base piece (Piece A).

Here I've taken Piece E, and glued it to cover the white 'Box' piece (Piece A) and the edges I folded over.
To cover the 'Cover' Piece, I glued the 'Cover' Piece (Piece B) onto the pattern paper Piece D.

Remember how Piece D was already at 12", so you had to cut 2 extra strips. Here is where you now glue the strips on. I've already folded over and glued the edges of Piece D. Now you glue a strip at each end.

This is what your piece will now look like.


Now glue Piece F to cover the white CS and edges.


Here's both piece's all ready for folding. Each piece is like a sandwich: 'Box' Piece is now made up of Piece C + Piece A + Piece E. 'Cover' Piece is now made up of Piece D + Piece B + Piece F.


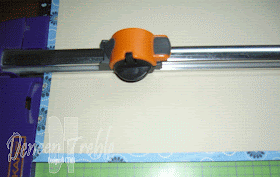
I used my scoring blade to score my pieces.

'Box' Piece: Score each side 1 7/8" from the edge.


Here's a close-up of the score lines.

'Cover' Piece: Score 5 1/16" from the short side.


To make the box, you need to cut along the score line, and stop when you hit the other score line. Please see the photo. (A picture is worth a thousand words!) It doesn't matter which side you choose to cut. (I cut along the longer side).

Fold all score lines.


(I cut the little blue strip off so that when the box is folded, the inside is one continuous colour.....just my personal preference....see photo below.)

Here's a close-up of the little piece I cut off.


Glue the flaps...I used a glue stick, and I used clips to hold it together while it dried....I didn't want this puppy coming apart.

My computer wouldn't upload the photo's I took of the cover piece, so I will have to describe it for you.

This is your 'Cover' piece, and it will wrap around your box. Fold on the score lines.

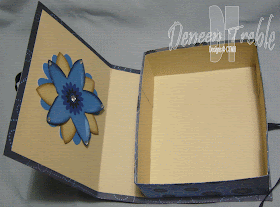
Here's the 'Cover' Piece folded at the score lines, it opens like a book. Here, I attached Navy grosgrain ribbon before attaching the box inside, and the cover image.

Glue the base of your box, and place it on the inside of one flap, you want to make sure the Box Piece is right against your score line. (Glue your box on the x side.)

And that's it to making this Stationary Box....I like to err on having too much information than not enough, so hopefully I covered all your questions, if not feel free to ask.

Enjoy,
Deneen