Saturday, July 31, 2010

Grandma's Brag Book

I sent my first From The Heart Package to my Not-So-Secret-Sister (it's a group of Christian ladies from Canada & US, and due to distance we email each other our praises/prayer requests, and talk to each other about our daily lives, etc....therefore it's difficult to remain 'secret'). Each month we mail a package including at least $5 worth of goodies. It just happened to be my NSSS's Birthday & Anniversary, so I was able to STUFF her first box full of goodies - I love to spoil her:)...Hi Rene', {hugs}.
.
She has a granddaughter, so I altered this photo album to be her Grandma's Brag Book.
I used CTMH Bella papers. I used my Slice to cut out the letters...love my Slice. And used the little girl from SS-Childhood Portraits. For the 'pearls' I used Liquid Pearls because there is not much room for 3-D...I still wanted to look 3D though...I did add Foam Squares behind the girl.
The back of the album I left room to add a picture...so it would look like it was framed...here I did add some Foam Squares to the corner pieces, and more Liquid Pearls.
I used Copics clear Spica pen to add sparkle to the dress and the letters.
Here it is in the album cover.
Here's the finished inside cover (the back inside cover is also the same).
.
I had so much fun adding goodies to the box! I can't wait until next month. Oh, and just in case you were worried that Rene' might see this post...I waited until she received her box before I posted this:)
.
Enjoy,
Deneen

Friday, July 30, 2010

Huge Sale on CTMH Level 1, Level 2 & My Stickease

Sale begins Aug. 4 through Aug. 11
While supplies last!
.
To go to my Website, click HERE!!
.
.
To view the LIST below, click on it.

To visit my website, click HERE!

Colour Challenge Entry

This week it's a Colour Challenge over on H2H Challenges. And this is my card using those colours.
.
Card Size: 4.25" x 5.5"
.
.
Here are the colors we were to use:
.
I picked up the Sept. '10 CardMakers Magazine on Wednesday, and on page 64, Irina Blount made a card using Nestabilities Fleur De Lis with the detail in the corner...I just HAD to scraplift the idea. I coloured the flowers using CTMH inks and Blending Pen.
.
Recipe: CTMH B&T-Blush, CTMH CS-Vineyard Berry & White Daisy, CTMH Ink-Vineyard Berry, Creme Brulee & Desert Sand, CTMH SS-You Are Beautiful, Blending Pen, Nestabilities-Fleur De Lis, Circles & Big Scalloped Circles LG, CTMH Creme Brulee Grosgrain Ribbon, Pearls, Foam Squares.
.
Enjoy,
Deneen

Sunday, July 25, 2010

Washer Pendant Necklaces & Keychains

Haley Dyer shared some awesome Washer Pendant Necklaces, and also made a Tutorial on how she made them....you can find her Tutorial HERE! Thanks so much Haley for sharing!!

.
I did one thing different than Haley's instructions...I cut my circles a little bigger than my washers, spread the glue, let them dry, and then trimmed them. It was easier than trying to fit the cut circle onto the washer with glue-y fingers. I trimmed the outside edge with scissors (and then filed them), and the inside circle I used myX-acto knife. Hopefully you've read Haley's instructions, otherwise what I'm saying is all Greek to you, lol:)

.
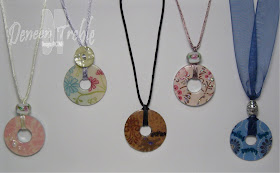
Here are my Pendants!!
They measure about 1.5" wide, and I bought the thick and the thin washers (I got to the store and stood there for a while trying to decide...thick or thin?) The thicker ones ended up being easier to work with, so I went and bought some more.


Aren't they the sweetest thing you've seen? I see that they've been around for a while, but I didn't get the memo, lol:( So I'm really enjoying them now.
.
The decisions one has to make. It sort of like the candles I made...so many ideas, so few washers:) First one has to decide what papers to use, then there's how to go about decorating them. And then...how to go about finishing them off to go around your neck. I need to do a little research on jewellery making so that I can finish them off nicely. For now, they will be tied around the neck...I did finish the ends with Liquid Glass, or a match to melt it, so that it won't fray.
.
Here's some more to enjoy! Haley!!! Look what you started, lol.
.

.
I also thought they'd be great as keychains! So here were 2 I did.
.
Again, a big thank-you to Haley for sharing her instructions and for the inspiration! If you have any questions on how I made mine, feel free to ask!
.
{Edited to add the following}
I have added a short Tutorial on how I add a 'clasp' to the Pendants, just click HERE.
.
Bobie asked me how I tied off the keychain. I thought I would try in words...but a PICTURE is worth a thousand words, so here's a picture of how I knotted the pendants, and how I tied the keychain. Hopefully it's helpful! Thanks for asking Bobie.

I should mention that for the keychain, I finished it off with a regular knot that I applied Liquid Glass to, to keep it from opening. I'm researching a slip knot for the Pendant Necklaces (to make them adjustable!)

Enjoy,

Deneen

Winner of the Blog Candy!!.and other updates.

So everyone's name went into a hat...well, actually it was a bowl...and my daughter pulled the name.....drum roll please................................................................................................................................................................................and and the winner is...........Twyla Norris!!! Twyla, if you could email me your address, I'll get your prize pack in the mail!! (dltreble@hotmail.com)
.
Thanks everyone for your kind comments. I love to create and share with you all, and it's great to know it's appreciated....and that someone actually reads my posts, lol:)
.
.
.
On a different note:
I just wanted to let you know that I now have a CTMH Website (I'm so excited to have one!!). You can:
Shop for products....in your jammies if you want to!!
Have fun with Digital Scrapbooking....called Studio J.
Watch Art & Soul (CTMH TV)....a ton of episodes packed with tips and techniques.
View the Catalogue online
and view a few other things.
.
So feel free to stop by anytime, I posted an 'EASY' button on my sidebar:)
.
Thanks again for posting your comments! Have a great day,
Deneen

Friday, July 23, 2010

Partial Embossing with the Cuttlebug

I had a couple of inquiries as to how I embossed the front of my White Tweaked Card, so I thought I would do a short tutorial...okay, maybe not short, but a tutorial for you. At the end, I also explain how to emboss a card front with a non-repeating pattern embossing folder....say that one fast 5 times. Aha!! Now raise your hand if you tried it:)
.
Card Size: 4.25" x 5.5"
.
.
Partial Card Front Embossing using the Cuttlebug
.

.

.
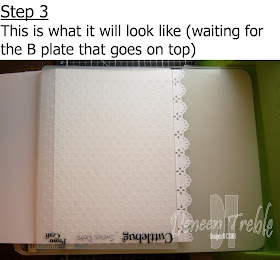
I forgot to mention that you will want to leave a space between the border punch and the embossing folder, so that you can add an embossed line after. (You can see this in the Step 3 photo)
.
.
Step 4a: Emboss card (send it through the Cuttlebug)
.

.
Step 5a: Put the B plate on, not quite to the fold, and emboss.
.
.
.
.
.

.

.
Partial Card Front Embossing with Non-Repeating Pattern Embossing Folder
.
The design on the folder may not be centered on the plastic...just wanted you to keep that in mind, that's why I suggested centering the design on the card front (and not the folder itself).
.

.

.
Hopefully I shared a tip about embossing that you didn't know before. Now you can try it out for yourself!
.
Thanks for stopping by,
Deneen

Tuesday, July 20, 2010

Thomas Kincade Covered Journal

I'm loving the CTMH Bella papers for covering my journals. Here was one I did for my niece as a graduation gift.
I typed the scripture verse up on computer and printed it onto Colonial White CS, and then cut it out using Nestabilities.
.
Here's a close-up of the lighthouse. I used Copics Spica clear glitter pen to make 'rays' coming from the light...and used a clear rhinestone for the light.
.
For the inside cover, I added a bookplate so that she could add her name, or any other information she wanted.
.
Well, this post was short and sweet and lacking in personality:), sorry 'bout that....I have a wicked headache (I don't get them very often) and just kind of wanted to get this done so that I can go lay down...on my nice soft pillow...in a cool, dark room...on a firm, but not too firm mattress...with no little ones wanting attention.
.
Enjoy,
Deneen

Thursday, July 15, 2010

More Candles...someone please stop me:)

Okay, I am having waaaaaaayyy too much fun!!! I didn't even let the Stickles dry on the Candles candle before I took the picture, lol. I keep thinking up new ideas for them. I posted Candle Stamping & Tutorial a couple of days ago...you can find that HERE.
.
I popped into Dollarama to pick up some holders for my Copics, and thought, "I wonder if it would work with coloured tissue paper?" So I picked some up. Once home, I wondered if Impressabilities would work, sure enough, they did (and you don't need the Cuttlebug or other machine for it). I then used some Nestabilities dies as well.
.
Candle Size: 4" x 2.5" (found them at Superstore for $1.99, run and grab them...before I do!!! LOL)
.
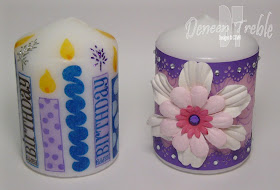
Candle candle: CTMH SS-Candlelight, I used a white, light purple, and light blue tissue paper. I stamped using Hydrangea, Black and Moonstruck for the candle, and Honey for the flame. I added stickles to the 'Happy Birthday' flame. I also attached some of the flames to the top of the candle...it took a couple of tries because it helps when you keep the wax paper flat on the image, and the candle is rounded. But it turned out GREAT!
.
Pink Posy Candle: I inked up Flower Silhouette Impressabilites using Hydrangea (I added the ink to the Impressabilities by inking directly from the stamp pad), remove the scrap piece of paper under the Impressabilities (that you used to protect your surface while inking it up), lay the Impressabilities on a fresh piece of paper, place the tissue paper VERY carefully on top of the Impressabilities, I then carefully place the rubber mat on top, and pushed gently...the tissue soaks up the ink very easily so it doesn't require much pressure. Remove mat, and tissue paper. I inked a second piece of tissue paper (because one piece isn't quite big enough to go around the candle). I finished it off with a Martha Stewart border punch, rhinestones and flowers.
.

.
Here are some Christmasy ones...early I know, but B-E-A-U-T-I-F-U-L if I say so myself:)
.
Blue Thomas Kincade: I used Nestabilities to cut out, and frame this image. I stamped the image with Moonstruck, then cut it out with the Nestabilities. I then cut a frame from dark blue tissue paper. Next time I'll ink the image edges with Moonstruck.
.
Wreath Thomas Kincade: I stamped the image on white tissue paper with Black ink, cut it out with Nestabilities, and coloured it very simply with Copics...just to give it a touch of colour. I then inked the edges with Tim Holtz Vintage Distress Ink (*CTMH Cocoa bleeds and changes colours when you apply it to the candle*). I then finished it off with Martha Stewart punches and red Stickles.
.
Snowflake: The snowflake is using Impressabilities...same method as Pink Posy (above). I finished it off with ribbon and CS, and Cuttlebug's snowflake Die.
.
The close-ups....
.
.
.
.
.
.
.
Here's the candle before I added the CS.
.
.
.
I added glitter to the snow...the areas that the moonlight or light from the window would hit.
.
I stamped 'Winter' onto white tissue paper, but of course when the wax melts, it takes on the darker colour...that's why it's mottled looking:)
.
I sure hope I inspired you to try Candle Stamping!!!
.
Enjoy,
Deneen