Monday, September 27, 2010

A Little Boy Overalls Card, for Heart 2 Heart Challenges

Welcome here, hope you're having a great day so far. This week on Heart 2 Heart Challenges it's an
ABC Challenge.
A=include an alphabet in some way,
B=must be a card (or other item) for a boy,
C=must include the color Chocolate.

Here is the card I made for the Challenge. I designed the template back in July 2008, you can find that post HERE. I hadn't used it in a while and thought it would be perfect for this Challenge.

Card Size: 4.25" x 5.5"
Recipe: CTMH CS-Baby Blue, Chocolate & White Daisy, CTMH Ink-Chocolate & Black, CTMH SS-Happy Birthday, Nestabilities-Fancy Tag Trio's 2 & Oval, Slice, Black Marker, CTMH Chocolate Bigger Brads, 3D Foam Squares, Copics-C3.
I used CTMH's black Stipple Brush to add some texture to the overalls, and drew lines for stitching. I used my Slice to cut the letter B. The white dots are made by sanding the CS after it was embossed with the Fancy Tags Trio 2.
Here is a repost of my Little Boys Overalls Template for you to enjoy:
This week on Heart 2 Heart there's a 4 for 40 Challenge. When the number of players for this week reach 40, one lucky winner will receive 4 cards made by H2H's very own Jamia - Paper Madness Inc. To see one of the cards she is offering you can click on her link, or go to the H2H Challenges blog. You'll also find more great ABC Challenge artwork by the DT at H2H, or you can click on the DT links in my sidebar.
We'd love to see what you create using the ABC Challenge, just post your creation to your blog or other public forum, and then head on over to the H2H blog and add your link!
Enjoy,
Deneen


Thursday, September 23, 2010

JustRite Friendship Set Cards

Welcome here! Fall weather has certainly come to where I live, how about you? Still enjoying some warm summery days, or do you have to scrap your windshield in the morning:)?
.
Today I'm sharing some samples I made for Sharon from The Scrapbook Cottage. And I actually designed the cards with NO pattern paper. Imagine that, lol. I wanted the stamps to stand out, so I decided not to use any pattern paper to compete with them. I did use embossing folders and other techniques to add texture. Let's take a look.
.
Card 1
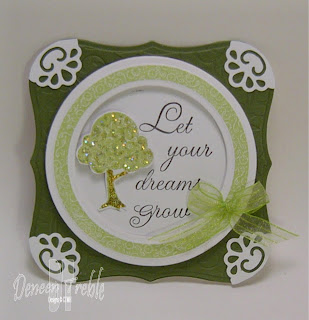
I used Impressabilities with Nestabilities for the background. I love how the border stamp frames the sentiment.

I stamped, and cut out the tree. Then attached it with Foam Squares and added Stickles.


Card 2
Ya know I had to use a new Martha Stewart Punch somewhere:) This is the Ribbon Loop corner and border punch. I wanted to show that you don't have to stick with circles...and I didn't use the border stamp.
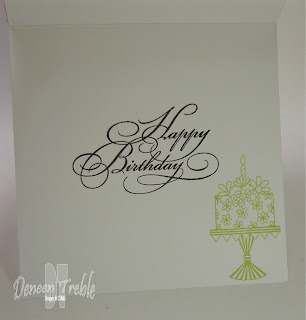
I coloured in the cake with Copics, and added Smooch to the icing and cake stand.


Card 3 - 4.25" x 5.5"
I stamped the image on Spring Iris CS, and the border on White Daisy CS. I then cut them out with Nestabilities, and attached the image inside the border.
I used Smooch to colour in the image, and add the detail at the bottom.


Card 4 - 4.25" x 5.5"
For this card I stamped the image and cut it out using Nestabilities. I then stamped the border sentiment, but when I cut it out I only used the top half. For the background, I embossed the lines with my Scor-It and pierced some holes in the corners. The image is coloured with Copics.
Card 5 - 4.25" x 5.5"
For this card I cut a scalloped window in the front. I used a Martha Stewart corner punch, coloured the flowers with Copics, and added Stickles to the bow.
I stamped the image on a separate piece of CS, because it was easier to line up with the window.
Last, but not least, Card 6 - 4.25" x 5.5"
The image I stamped on White Daisy CS, and attached it with Foam Squares to the Border piece of CS. I used 2 Cuttlebug EF for the background, and another new Martha Stewart Punch:)
This time I coloured the image with chalk, and added Stickles to the bow.
Hope you have a great day, thanks for stopping by!
Deneen

Monday, September 20, 2010

H2H Sketch Challenge Card

Okay, where did the week go, didn't I just post the H2H Challenge, lol? Well, a new week a new Challenge:) This week it's a Sketch Challenge at Heart 2 Heart Challenges. Here's my card based on the sketch:
Card Size: 5" x 5"
.

Here's the sketch:
I used Floral & Stone Impressabilities with Nestabilities Labels 3. And the B&T paper is the back side of Passages, it's just as pretty isn't it? I used another of my new Martha Stewart punches for the corner, Ribbon Loop:) I coloured the image with CTMH Markers, and added pink Stickles to the flowers on the cake. (which the photo below is trying to show).
Here's the inside:
Recipe: CTMH PP-Passages, CTMH CS-Cocoa, Sweet Leaf, Desert Sand & White Daisy, CTMH Ink-Black, Sweet Leaf, Spring Iris, Blush, Baby Pink, Buttercup, Sunflower, Grey Flannel & Cocoa, CTMH SS-Piece of Cake & Gracious Greetings, Nestabilities-Circle & Labels 3, Impressabilities-Floral & Stone, Foam Squares, Martha Stewart Ribbon Loop Corner Punch, Cream Grosgrain Ribbon, Cream Organdy Ribbon, Pink Stickles, Pearls, Rhinestones.
.
Need some more inspiration?, check out the awesome samples by the other members of the DT, the links are in my sidebar, or you can click on over to the H2H Challenges blog. We'd love to see what you do with this Sketch, so once you post it to your blog or other public forum, add your link to the H2H blog!
.
Hope you have a great week.
Deneen

Monday, September 13, 2010

Heart 2 Heart Challenge Card

It's Monday again, and that means another Heart 2 Heart Challenge! This week the challenge is: Sentimentally Yours - Use a sentiment as your focal point rather than an image. Here's the card I made to inspired you.
.
Card Size: 4.25" x 5.5"
I used one of my new Martha Stewart Punches, gotta love that:) The sentiment, and the fancy tag are attached with Foam Squares. I used my Impressabilities with my Nestabilities to emboss the New England Ivy CS.
.Recipe: CTMH PP-Mistletoe, CTMH CS-Cranberry, New England Ivy & Colonial White, CTMH Ink-Bamboo, Black & Chocolate, CTMH SS-Beautiful Flourish & Everlasting Life, Nestabilities-Labels 9, Labels 4 & Fancy Tags, Impressabilities-Snowflake, Colonial White Satin Edge Organdy Ribbon, Foam Squares, Rhinestones, Martha Stewart French Scroll Border Punch.
.
Unfortunately we didn't reach 40 players, so no one won the 4 for 40 card I posted last week:( Be sure to invite your friends to play along with us at H2H. This week the Prize Sponsor is Corinna McGregor, her blog is Stamping with a Java Junkie. Be sure to pop 0n over and see what she is offering one lucky winner this week!!
.
Why not join us at H2H? Post your creation to your blog or other public forum, and add your link at H2H so we can all take a peek. You may even be chosen for the Friday Five! The other members of the DT did an outstanding job...like always:) You can check out their creations by clinking on the links in my sidebar, or popping on over to H2H.
.
Enjoy,
Deneen

Tuesday, September 07, 2010

More Cards That Didn't Win

I made these cards for the CTMH Make It From Your Heart Contest for Consultants. I hope you're inspired even though they didn't win.
.
This first card was an oops, lol. I made the card thinking the contest was for showcasing the new stamp sets. The contest for cards needed to showcase the new papers. So I added the thin strips of Mistletoe, and still submitted it even though I know it wasn't showing much of the paper.
.
All Card Sizes: 4.25" x 5.5"
.
The tree is from the Tannenbaum Stamp Set. I embossed it with Gold EP, I clear embossed the tops of the tree on the White Daisy CS. I used the Corner Rounder to make the scallops, and finished it off with pearls and rhinestones.
.
This next card I wanted to show that the Olivia papers could be Christmas-y too. I used the set of trees from Holiday Trinkets to stamp a background. I used the Blending Pen to colour in the tree.
I embossed the tree with Black EP, and finished the card off with rhinestones and colonial white grosgrain ribbon.
.
Here's the card I made to showcase the Mistletoe papers (since I oops it on the first card:)). I used the stamp set Snow Days, and the sentiment is from Everlasting Life. I used the Blending Pen to colour in the house, and Prisma Glitter to add sparkle to the snowy areas.
I embossed the sentiment with Black EP on vellum, and attached it so the edges were not flat but curled up a bit.

.
I made a total of 5 cards, and none of the 5 won. Oh well, there's always next catalogue release:)
Enjoy,
Deneen

Sunday, September 05, 2010

It's a Colour Challenge, and A Prize

This week on Heart 2 Heart it's a Colour Challenge! Here's my card for inspiration. Hmmmm, I just noticed I didn't use a stitch of B&T paper, interesting. The flowers I coloured by using the sponge dauber. I cut a leaf shape from a folded piece of New England Ivy CS, added some veins with my embossing stylus (on the back), and then inked the raised embossing.
.
Card Size: 4.25" x 5.5"

Recipe: CTMH CS-Autumn Terracotta, New England Ivy, Honey & Colonial White, CTMH Ink-Black, Autumn Terracotta, New England Ivy & Honey, CTMH SS-Circle of Love, Dark Green Organdy Ribbon, Foam Squares, Martha Stewart Scroll Lace Border Punch, CTMH Just Blooms, Pearls, Nestabilities-Circle & Scalloped Circle.
.
And here are the colours to use:
Now, on to the Prize information!!
.
On the weeks there is not a Prize Sponsor, H2H will be adding a new challenge: 4 for 40. When the number of players for that week reaches 40, a random player will be chosen to receive 4 cards made by one of us on the DT. This week it's ME! Yup, if we reach 40 players, one lucky person will receive 4 cards from moi. If you're the winner, the following card is 1 of the 4 you will receive...the other 3 are a surprise.
.
As an added bonus, the DT member providing the prize for
4 for 40will share one tip, trick, tool, or other idea that we use in our cardmaking. So pop on over to the H2H blog and check out what I had to say, see the creations the other DT members made, and add your creation to the link for a chance to win this card:

Be sure to tell everyone you can think of to join us for this week's Colour Challenge so that you have a chance to win this card, all we need is 40 players!
.
Enjoy,
Deneen

Saturday, September 04, 2010

Loser Cards:(

Okay, ya got me, they're not really losers, they just didn't win. I made these cards for the CTMH Make It From Your Heart Contest for Consultants. And since I didn't get a call from CTMH, I can show them to you for your viewing pleasure:)
.
Card Size: 4.25" x 5.5
.
I used Magnifique Level 2 B&T Papers for the card. I found a origami 3D star tutorial online and thought it would be perfect for this card. I added Prisma Glitter to the Organdy Ribbon, and behind the star, and even added Prisma Glitter to the Brads! The Stamp Set is called Everlasting Life and I embossed it with Silver Embossing Powder. I used the Corner Rounder to make the scallops.
.
Here's another loser non-winning entry:)
Card Size: 3.5" x 8"
.
The Stamp Set I used is called Harmony, and I used Magnifique Level 2 B&T Paper again. I coloured in the birds and nest with the CTMH Blending Pen, and attached them with Foam Squares. I Clear Embossed snow flakes behind the birds and nest.
{Sigh} I was hoping I would have won something, but there's always next catalogue release!! I have a couple more cards that didn't win, but I'll post those another day. Enjoy.
.
Hope you all have a great Labour Day Weekend:)
Deneen

Wednesday, September 01, 2010

What Is Smooch?

(Grab your coffee, this is another llloooooooonnnng post, but well worth the read!!)
.
Welcome to another edition of Deneen's Behind The Scene. (Lol, I just made that up, sounds good though). Last time we looked at Spellbinders Impressabilities - How to get a great impression, and ways to use them. You can find Part 1 HERE, and Part 2 HERE. This time I am going to take a look at Smooch.
.
Like me, you may have wondered what Smooch is. Well, I hope to clear that up for you today!! Sharon, from The Scrapbook Cottage, sent me home with some bottles of Smooch to play with. As I looked on the Net for ideas, I found that there really wasn't much out there. I thought, "If I can't find much about Smooch, then others aren't either...how many bottles of Smooch are stashed away in the back of people's drawers being unused?" I must admit, I was feeling a little ho-hum about them too. "It's just another way to embellish projects," I thought. Well, let me tell you, once I got playing with them, the ideas kept coming of where I could use it. So let's dig in and I hope I can inspire you to dust off your bottles of Smooch!! (and no, I am not being paid to advertise Smooch, lol, I just hate buying products that end up not being used because I was disappointed with it when I tried it at home)
.
Here were the colours I worked with, even the names are yummy sounding. Luscious Lime, Grape Soda, Kiwi, Nautical Navy, Pool, Moonlight and Taffy.

Smooch is made by Clearsnap, and comes in these cute bottles. Although it looks like nail polish, it isn't. It's a pearlescent ink, but works like acrylic paint. The tip is very stiff...you can get into the smallest corners...but you can also use it like a brush. (I don't have a picture of it, but I'll add it to the bottom of the post later.)
One of the ways to use smooch is to highlight embossing. Here, I used the same colours (Taffy, Grape Soda, Luscious Lime, Pool, Moonlight) of Smooch on 2 different colours of cardstock...and the looks are very different.
By tilting the paper slightly, you can see how pearlescent Smooch is.
Wouldn't it look great for snowflakes? I grabbed my snowflake embossing folder and tried it.
I started to find that each Smooch colour has it's own pearlescent qualities. Although Nautical Navy doesn't 'shine' as well here, as you read further on, you'll see where it does.
.
Oooooo, then I grabbed my Christmas tree folder to highlight some elements.
In real life you don't have to tilt the pieces up that much, but I'm not a photographer, so it's very difficult to capture the shine of Smooch.
I love that you can use both light and dark cardstock. Here, I learned that if you take short strokes, you'll get a smoother, less blotchy looking image. Here I used long strokes, thinking I could paint it, that's why he looks blotchy.
I couldn't capture the 'shine' as well, but the snowman is very pearlescent.
(Sorry about my fingers in the shot, but if I cropped it any closer, it got a little blurry and didn't look as nice:)
.
Like I said earlier, you can treat Smooch like acrylic paint. Another way to use Smooch is by colouring/painting your stamp, I then spritzed it lightly with water and stamped it. I spritzed it lightly with water again, and stamped and even one more time. It gives it a watercoloured effect.
Here I 'painted' my stamp, huffed on it (huffed=breathing on it like when you warm your cold hands up), then stamped it, huffed on it again, and stamped it once more.
.
Oops, I just noticed I took the picture upside down. The top 2 are huffed, the bottom 2 are spritzed with water. You can click on the photo to see it closer.
.
Again, I discovered that different stamps worked 'nicer' with the watercolouring technique. Look at how great it worked with this stamp.
The stamped images do have some pearlescent-ness to them, but it's a different look than when you add it directly to the image. The Smooch appears to dry on your stamp, but comes off the stamp very easy when I cleaned it on my Scrubber.
.
Another way to use Smooch is to colour your flowers! Here I tried out different colours to see how they looked. It was very quick and easy to colour, and dries almost immediately, so I could hold the coloured petals while finishing the uncoloured ones.
This is where I found the Nautical Navy amazing!! Can you image flowers coloured with Nautical Navy for wedding invitations etc.? Very nice.
.
Another way to use Smooch is to colour your images with it. Here I embossed the image with Silver Pearl, and then coloured in the image (I left the middle image plain so you can see what the image looks like before colouring.) It amazing on dark cardstock!! I could even colour the embossing...see the stems of the hanging flower...and it doesn't come off.
Here I used different coloured cardstock, again, you get a different effect.
I couldn't quite capture the shine...Grape Soda, and Taffy don't seem to shine as much in this technique.
.
Here I coloured in images that I stamped with ink. Some of the Smooch colours are more opaque than others (opaque=not transparent, a solid colour) For instance, Kiwi I coloured over the inked lines, and could still see the line. Moonlight was a little more opaque, it didn't allow the inked lines to show through as much.
I almost forgot to mention, I made the tiny dots on the purple flower with the tip of the Nautical Navy applicator.
.
Another way to use Smooch is as a highlight. The top flower I coloured with Copics, and then highlighted the dark purple areas with Grape Soda. The bottom flower I coloured with Smooch, and highlighted the left flower with Nautical Navy, and didn't highlight the right flower to show you the difference.
It's difficult to capture the pearlescent-ness on film.
.
Excuse the images, lol, these were just practice colourings I pulled out of my stash. But they work great for highlighting with Smooch. The polkadots on the umbrella were red, I coloured them with Smooch. Again, you can see how different Smooch colours vary in how opaque they are. I added Smooch to her collar, and boots, and made a puddle from Nautical Navy.
See it shine!!
Again this is just a practice image, but I added raindrops with Smooch, and a puddle! Same image, but a totally different look!!! How exciting is this Smooch now!?! I found way more possibilities for Smooch than I initially thought there would be.
All together now.......Wow, no way!! Isn't that the neatest thing you've seen? At least today, lol!
Well, I'm at the end of what I have to show you, but at the beginning of many more possibilities with Smooch. I hope I've opened that drawer for you, and all you have to do is grab that dusty Smooch bottle, open it, and go play!!
.
This is what I love about blogging, being able to share what I have learned with all of you!! I've done the work so that you can go play:)
.
I'll try and get those pictures of the applicator loaded today.
Enjoy, and be sure to post and show me and others how you have used Smooch!!! And let me know if there is a product/technique that you have always wondered about. I may feature it in an upcoming episode!!
Deneen
.
Ack, I almost forgot, some of the other ways to use Smooch (which I don't have photos of):
*Colouring on metal embellishments (again, some colours colour nicer than others)
*Colour on brads...coloured and metal. Add Nautical Navy to a big red brad...you have a ladybug:)
It takes longer to dry on metal...I left them at The Scrapbook Cottage overnight...I have yet to go check on them.
.
Cheers!
.
Edited to add photos:
Here is the Smooch brush.

LinkWithin

Related Posts with Thumbnails