Showing posts with label Template. Show all posts

Tuesday, January 10, 2017

Cuttlebug Mania Winter Wonderland Challenge (Template and Link)

Hello and welcome here!  Wow, time flies and it's a new year already.  Here's to being creative this year!!  Cuttlebug Mania is back at it and this time the challenge is Winter...nature, snow, ice, winter sports etc.

Challenge - Winter
(nature, snow, ice, winter sports etc.)
For a chance at winning an awesome prize, link your creation over at Cuttlebug Mania.


Challenge runs for 2 weeks. 

Don't forget to let us know how you used your Cuttlebug

Album Size:  4" x 6" (cover is 4.25" x 6.25)
I took a class at our local scrapbook store The Scrapbook Cottage and made a cute mini album.  I took my instructions and came home and made a ton more.  Okay, lol, not a ton, but at last count I made 14, with a few more prepped on my desk to finish. It's one of the one 12x12 sheets type.  But with this album you can add as many 12x12 sections that you want.  For these I added 2 12x12 sections.

So all in all, this album takes 3 cardstock and 3 patterned papers (or 2 pieces of CS and 2 pieces PP for the smaller album), with next to nothing left.  The spine is part of the measurements but I wanted a contrasting colour so I used an extra little piece of cardstock.

I love my Memory Box sled!  Perfect for the wintery feel of the album!


The way the cardstock is cut and folded, you can adhere the pages to make pockets for tags...which is all included in the measurements of the CS and PP.

Recipe:  PP-Authentique Wintery One, Three & Four, Bazzill CS-red, cream & green, Memory Box-Large Winter Sled, Richard Garay-Knitted Pattern EF, Martha Stewart-Branch Punch & Cherish Border Punch, Tonic Studio Ticket/Tag Punch, Hole Punch, Silver 5/8" Organza Ribbon, Red 1/4" Satin Ribbon, Natural Fibers, Foam Squares, Pearls.

Cuttlebug Items Used:
Memory Box Large Winter Sled Die
Richard Garay Knitted Pattern Embossing Folder

Hope you can join us for the Winter Challenge!
Deneen

I found the instructions online at Astrid's Artistic Efforts. It may look complicated but it's not really.  I decided to re-draw her cutting instructions for you.  For instructions on how to fold and glue, you can click the link in the sentence above.

Album Piece (I used 2 of these)


Cover and Tags 
(I increased my spine from 2 1/4" to 2 1/2")


Once you've read Astrid's instructions, here's a diagram of how I like to fold the album.
 Using her numbers from the first diagram above.  I like to fold 1 up to 2, and 6 down to 5.

Then I fold the bundle at 2 behind 3, and the bundle at 5 behind 4.

And finally fold 4 up to 3.
Then continue with her instructions for gluing the album together, making pockets.

Tuesday, April 28, 2015

Top Tip Tuesday Duo Challenge With Easel Note Holder Tutorial/Template

Hello and welcome here!  It's time for another Top Tip Tuesday Challenge and tutorial.  This time it's all about Duo's, anything that goes together, peanut butter and jelly, black and white, fish and chips, lock and key....you get the point.  I chose Paper and Pen, and made an Easel Note Holder to share with you.

Challenge - Duo
Tutorial - Easel Note Holder

Note Holder Size:  approx. 4.75" (wide) x 4.25" (tall), it sits open about 3.5"
 
You can find the TUTORIAL HERE on the TTT blog, but I will post the template I made below.  I based the holder on Jamie Lane's Easel Sticky Note Holder.  Instead of using Post-It Notes, I used loose notepaper that measures approx. 3.5" square.


Sponsor
 For a chance at the following prizes, be sure to link your creation to the Mello Yellow Challenge at Top Tip Tuesday, you can enter up to 3 times!! For a chance at an extra prize leave a tip on your blog and be sure to leave 'tip' after your name in Mr. Linky.
Don't forget the challenge runs for 2 weeks and closes at 1pm.

All Dressed Up - 2 Free Digi's
https://www.etsy.com/uk/shop/alldressedupstamps


Hope you'll join us for the Duo challenge, don't forget to check out the rest of the DT creations using stamps from All Dressed Up.
Deneen

Here's the Template I made for my Easel Note Holder.


Tuesday, March 31, 2015

Top Tip Tuesday Mello Yellow Challenge

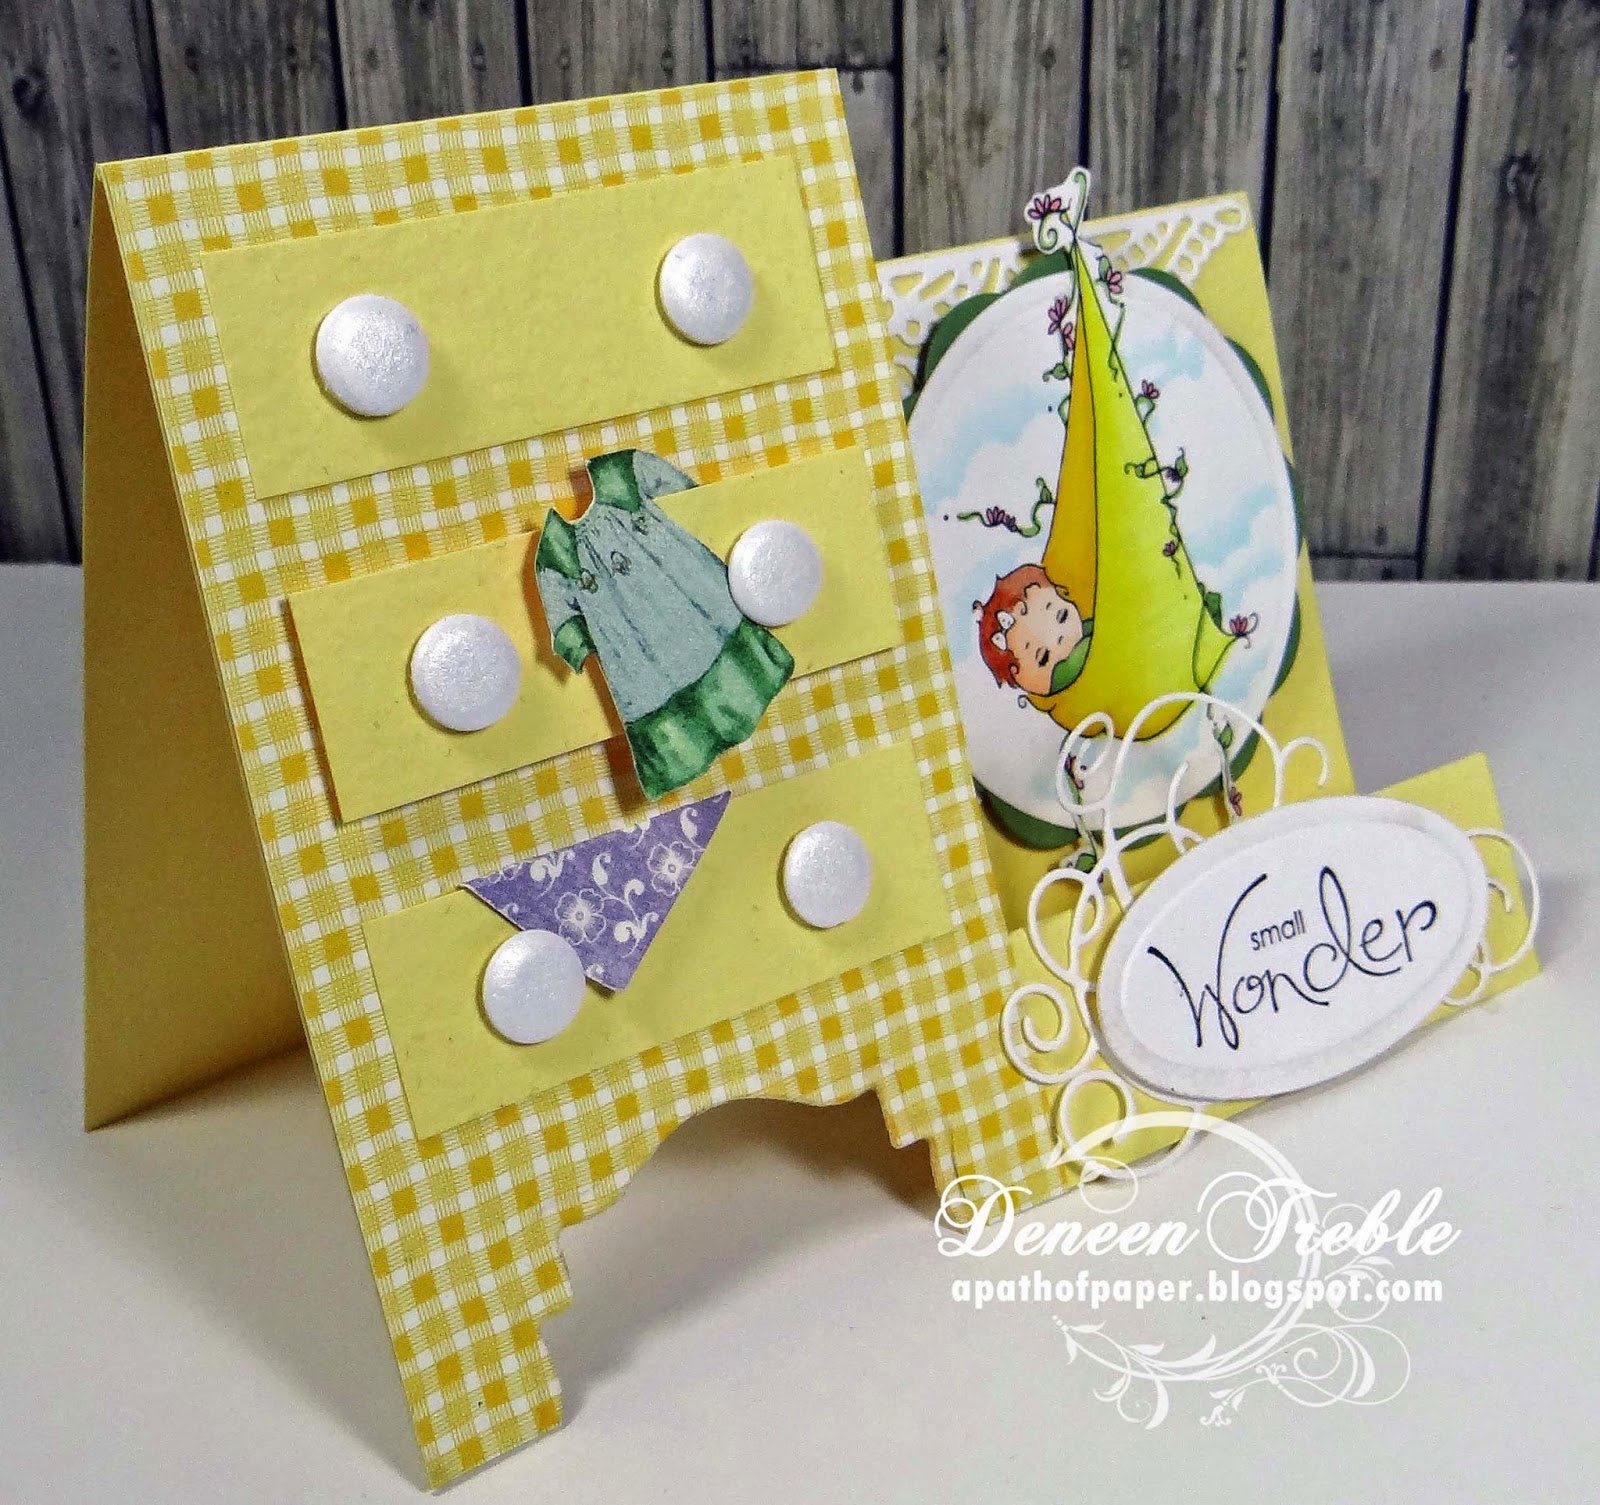
Hello and welcome here!  It's time for another Top Tip Tuesday challenge and this time it's Mello Yellow...anything with lots of yellow.  A few years ago I shared a Template for a Dresser Side-Step Card, well today I also did a Tutorial to go along with the Template, you can see that HERE.

Challenge - Mello Yellow
Tutorial - Dresser Side-Step Card

Card Size closed:  4.25" x 5.5"
Isn't it cute!  A big thank-you to Sami Stamps for supplying the DT with images.  I used the digital image Bundle of Dreams.

Sponsor
 For a chance at the following prizes, be sure to link your creation to the Mello Yellow Challenge at Top Tip Tuesday, you can enter up to 3 times!! For a chance at an extra prize leave a tip on your blog and be sure to leave 'tip' after your name in Mr. Linky.
Don't forget the challenge runs for 2 weeks and closes at 1pm.

Sami Stamps - $12 Gift Card
http://www.samistamp.blogspot.ca/

 
The dress is fussy cut from Graphic 45 patterned paper called Precious Memories Collection Sugar and Spice.

Recipe:  Sami Stamps: Bundle of Dreams, Bazzill CS-yellow, PP-Graphic 45 6x6 Secret Garden Patterns & Solids and Graphic 45 Precious Memories Collection Sugar & Spice, CTMH CS-White Daisy, CTMH Ink-Black, Spellbinders-Standard Circles, Petite Ovals, Large Scalloped Circles & Labels 18, Tattered Lace-Collecting Corners, Memory Box-Elegant Scrollwork, Foam Squares, Craftworks Cards Candi-Icing Sugar, Copic Markers.

Copics Used:
Skin - E000, E00
Hair - E13, E15
Blanket - Y08, Y11, Y13
Flowers - R32
Vine - G43
Sky - BG000

Hope you'll join us!  Don't forget to check out the rest of the DT creations!
Deneen

Here's the Template I made for the Dresser Side-Step Card, when folded flat it will fit in an invitation sized envelope.


Tuesday, October 14, 2014

Top Tip Tuesday Favourite Colour Combo Challenge

Hello and welcome here!  We celebrated Thanksgiving here in Canada yesterday, and we're all fed up, lol.  I don't think I want to see any more food...ever...again.  Today there's a new challenge over at Top Tip Tuesday and it's using your Favourite Colour Combination!  I'm also sharing a Tutorial and Template on how to make this Blocks Card so be sure to hope on over there to check it out.

Challenge - Favourite Colour Combo
Tutorial - Blocks Card

Card Size Standing:  4.5" tall, 4.5" long, 1.5" wide
 Card Size Flat:  4.5" x 6"
My favourite colour combo is anything using purple.  Usually purple and white.  A big thank-you to Kenny K for supplying the DT with images.  I used Troublemaker digi stamp and coloured her with copic markers.

Sponsor
For a chance at the following prizes, be sure to link your creation to the Favourite Colour Comb Challenge at Top Tip Tuesday, you can enter up to 3 times!! For a chance at an extra prize leave a tip on your blog and be sure to leave 'tip' after your name in Mr. Linky.
Don't forget the challenge runs for 2 weeks and closes at 1pm.

Kenny K - 3 Digital Images
 

I found the instructions HERE and I made up a template based on her video.  You can find the Template below.


It folds flat for mailing!

Copics Used:
Skin - E000, E00
Hair - Y11, Y17, YR21
Eyes - G12
Jeans - B91, B93
Sweater - V09, V12, V15, V17
Shirt - YR30
Shoes - E40, E41, E42, E43, E44
Ice Cream - E33, E37, E53, R02, R12, R22

Recipe:  Kenny K Digital SS-Troublemaker, PP-Crate Paper Katlin Collection Bubblegum & Graphic 45 Nutcracker Suite Collection Nutcracker Suite, Bazzill CS-purple, CTMH White Daisy CS, Taylored Expressions SS-Many Minis-Occasions, Taylored Expressions Designer Mini Tags Die, Tattered Lace Borders & Corners, Spellbinders-Floral Ovals, Poppy Stamps-Village Light Post, CTMH Black Ink, Flowers, Foam Squares, Copics.

Here's the Template I drew up.   

 Hope you'll join us for the Favourite Colour Combo Challenge.
Deneen


Tuesday, June 24, 2014

Top Tip Tuesday Ribbon/Twine Challenge and Box Card

Hello and welcome here!  It's another Top Tip Tuesday Challenge and this time it's a ribbon/twine challenge where you need to use 2 or more pieces on your project.  I've also written up a Tutorial and Template for TTT on the Box Card you see here.  The tutorial you can find over on today's TTT post, but I'll add the Template here.

Challenge - 2 or more Ribbon/Twine
Box Card Tutorial & Template

Card Size:  4.25" x 5.5"

 A big thank-you to 2 Cute Ink for supplying the DT with images.  I used Angel Fish Doodle for my card.  The card opens in the middle to reveal a hidden box when you slide off the belly band.

Sponsor
For a chance at the following prizes, be sure to link your creation to the 2 or More Ribbon/Twine Challenge at Top Tip Tuesday, you can enter up to 3 times!! For a chance at an extra prize leave a tip on your blog and be sure to leave 'tip' after your name in Mr. Linky.

Don't forget the challenge runs for 2 weeks and closes at 1pm.

2 Cute Ink - 2 Images of Winner's Choice
http://www.2cuteink.com/


The belly band slides off.

The box opens and reveals money, or photos, or a gift card etc.

Because of the folds it wants to pop open, but it does fold fairly flat to fit in an envelope.


Copics Used:
Fish - BG72, BG75, BG78, B37, YR14
Water - BG0000
Shadow - N1, N3

Recipe:  My Mind's Eye PP-Winter Wonderland "Presents" Paper, Bazzill CS-blue & orange, Spellbinders-Labels 23, Standard Circles Lg. & Sm., Marvelous Squares & Beaded Circles, Cuttlebug Die-Vintage Corners, Verve Stamps-Big Wish, CTMH Black Ink.


Enjoy,
Deneen

Tuesday, October 29, 2013

Top Tip Tuesday Fun Fold Winter Card

Hello and welcome here!  We are enjoying the last few days of October, the crisp air in the mornings, and I love getting into the car when it's been warmed up by the sun.  It's time for another Top Tip Tuesday Challenge and it is a Seasons Challenge.  We have four seasons here in Canada and I really enjoy Winter.

Challenge - Seasons

Card Size:  4.25" x 5.5"
I love the Spellbinders A2 Filigree Delight die and made a simple front for my card.  There's a fun fold hiding inside!

Sponsor's
 For a chance at the following prizes, be sure to link your creation to the Seasons Challenge at Top Tip Tuesday, you can enter up to 3 times!! For a chance at an extra prize leave a tip on your blog and be sure to leave 'tip' after your name in Mr. Linky.
Don't forget the challenge runs for 2 weeks and closes at 1pm.
 
 Sweet Stamps - $10 Gift Certificate

 Birdie Brown - 3 Digital Images


I changed up the Template by Norma that I found HERE so that I could make a 4.25" x 5.5" card.  It came together quite quickly!

Recipe:  PP-BoBunny Silver & Gold-Trees, Gift Shoppes & The List, CS-red & yellow/gold, CTMH White Daisy CS, Spellbinders A2 Filigree Delight, Standard Ovals & Labels 17, Memory Box Glowing Candles Die, Foam Squares, May Arts 1.5" Gold Crinkle Ribbon.

For more Seasons inspiration be sure to check out the rest of the DT creations, their links are in my sidebar, or head on over to the TTT Blog!
Deneen

Wednesday, July 31, 2013

Heartfelt Creations Watering Cans

Hello and welcome here!  I hope you're having a great week, if not I hope the rest of your week goes better!  It's time for some Heartfelt Creations inspiration.  This week I made some Watering Cans.

Size:  ~4" x ~5.5" 
I found the template and instructions for the Watering Cans HERE.  I printed the Template onto white CS and cut it out, and I used that as a template for making my Watering Cans especially because I used different colours to make the final project.


I used pattern paper from the Burst of Splendor collection and the vine die from Decorative Chateau Gate.


Recipe:  HC PP-Burst of Splendor Paper Collection, HC Die-Decorative Chateau Gate, Bazzill mauve CS, CTMH White Daisy CS, Black Felt Pen.

I used the pretty patterned paper from the Daphne Paper collection, the eyelet edge is from the Gift Ensemble Die, and I used the flowers and motif from the Layered Scallop Posy Die collection.

I cut the handle a bit narrower than the template so that the flowers made a pretty edge. I love that the patterned paper is double sided so that the inside is just as pretty as the outside of the Watering Can.

Recipe:  HC PP-Daphne Paper Collection, HC Die-Gift Ensemble & Layered Scalloped Posy, Bazzill Prismatics CS-Herbal Garden Med., Black Felt Pen, Pearls.

I wanted to do one Watering Can with a bouquet of flowers in the top and then realized that they would be too big so I decided to make 1 bigger flower instead.  For the Watering Can I used the Daphne Paper Collection, and for the flower I used the Posy Patch Collection. 


I love that Heartfelt Creations stamps and dies work together.  I stamped a bunch of flowers using Open Vintage Floret stamp set and then die cut them using the Vintage Floret die...easy-peasy as my kids would say:)  

I also used the Paper Blossoms Molding Mat and Tool Kit to shape the petals...I used to use my fingers, but I must say I don't know how I lived without these 2 tools for shaping my flowers.

Recipe:  HC PP-Daphne & Posy Patch, HC SS-Open Vintage Floret & Open Leaf, HC Dies-Vintage Floret & Classic Leaf, Spellbinders-Decorative Labels 8, Marvelous Squares, Paper Blossoms Molding Mat and Tool Kit, Bazzill Prismatics CS-Herbal Garden Med., CTMH White Daisy CS, CTMH New England Ivy Ink, Memento London Fog Ink, Black Felt Pen, Crystal Ice Stickles.

For more Hearfelt Creations inspiration be sure to check out the rest of the DT creations their links are in my sidebar, or pop on over to the Hearfelt Creations Blog!

Enjoy,
Deneen

LinkWithin

Related Posts with Thumbnails