Monday, December 27, 2010

Belated Merry Christmas

I hope everyone had a great Christmas, we did here in our home.
.
I don't know if we are lucky, or unlucky, lol...our internet and cable went down just before Christmas and the company apologized and said they will be out to fix it.......JANUARY 4th!!!! Yikes, that's 2 weeks with no internet...just think of the emails piling up, not being able to post to my blog. Well, I should look on the bright side, maybe I should go buy a lottery ticket, with this kind of luck we just might win:)
.
I also want to wish you all a Happy New Year!!!
.
See ya in the New Year,
Deneen

Wednesday, December 22, 2010

Purses Anyone?

I totally forgot to share with you the purses I made for the Craft Sale I was at. My first post on purses can be found HERE, where you will find the link to the Template, and Instructions.
.
So without further ado, here they are. (Purse Size: 6.5" x 7")


CTMH PP-Magnifique, CTMH CS-Colonial White & Outdoor Denim, Cuttlebug EF-Tiny Mosaic.
.

CTMH PP-Cherry O, CTMH CS-Sweet Leaf, Cuttlebug EF-Argyle.
.

CTMH PP-More To Adore, CTMH CS-Chocolate & Colonial White, Cuttlebug EF-Victoria.
.

CTMH PP-More To Adore, CTMH CS-Chocolate, Cuttlebug EF-Tiny Mosaic.
.

CTMH PP-Daydream, CTMH CS-Sweet Leaf, Cuttlebug EF-Victoria.
.

CTMH PP-Let's Get Together, CTMH CS-Buttercup & Garden Green, Cuttlebug EF-Swiss Dots.
.

CTMH PP-Sweet Home, CTMH CS-Buttercup & Garnet, Cuttlebug EF-Swiss Dots.
.

CTMH PP-Sweet Home, CTMH CS-Buttercup & Garnet, Cuttlebug EF-Victoria.
.


CTMH PP-Bella, CTMH CS-Pansy Purple, Cuttlebug EF-Tiny Mosaic.
.

CTMH PP-Emporium, CTMH CS-Vineyard Berry & Juniper, Cuttlebug EF-Victoria.
.

CTMH PP-Silhouette, CTMH CS-Black, Cuttlebug EF-Victoria.
.

CTMH PP-Olivia, CTMH CS-New England Ivy, Cuttlebug EF-Argyle.
.
Hope you were inspired! Thanks for stopping by. I won't be posting regularly the next couple of weeks, but will get back on track in January.
.
Merry Christmas to all, and to all a Good-Night:)
Deneen

Thursday, December 16, 2010

I WON AGAIN!!!!!!

Antoinette, from Inspired Stamps, illustrates and produces her own stamps. She just recently started her company and has been having some great give-away opportunities.

I was randomly drawn the first time...seen HERE. I just received this awesome prize pack in the mail on Tuesday and was planning on inking up this weekend!!! And then I found out this morning I won her second contest!!!!...seen HERE. We were to tell her what our favourite Bible verse was and why. She plans on making them into a stamp! How awesome is that. She chose 4 winners and I just happened to be one of them!!! Thanks so much Antoinette for the opportunity.

If you haven't seen her stamps yet, please pop on over and say 'hello'. She's having ANOTHER Contest TODAY, and this time there will be 40 WINNERS.

Have a great day!

Deneen

Monday, December 13, 2010

Christmas Ornaments using Nestabilities

Welcome here on this chilly morning, today the high is suppose to be -17C (1F), but the windchill is going to make it feel like -35C (-31F), just a tad bit cold:) Welcome winter, lol.
.
This is my last challenge as part of the Heart 2 Heart Design Team for this term. It's been alot of fun sharing with you all, and being part of a team of other great paper creators:) Thanks Mary, for putting so much into the Heart 2 Heart Challenge Blog and making it run so smoothly! And thanks to all who play along, and who are inspired by the Challenges. I look forward to being surprised on Monday's with the rest of you.
.
For my last Challenge as DT member I was a bit of a rebel, lol:) The Challenge is Holiday Cards- Christmas, Hannukah, New Year's etc. When I first read the Challenge I didn't see 'cards', so I made a Holiday item...an ornament.
.
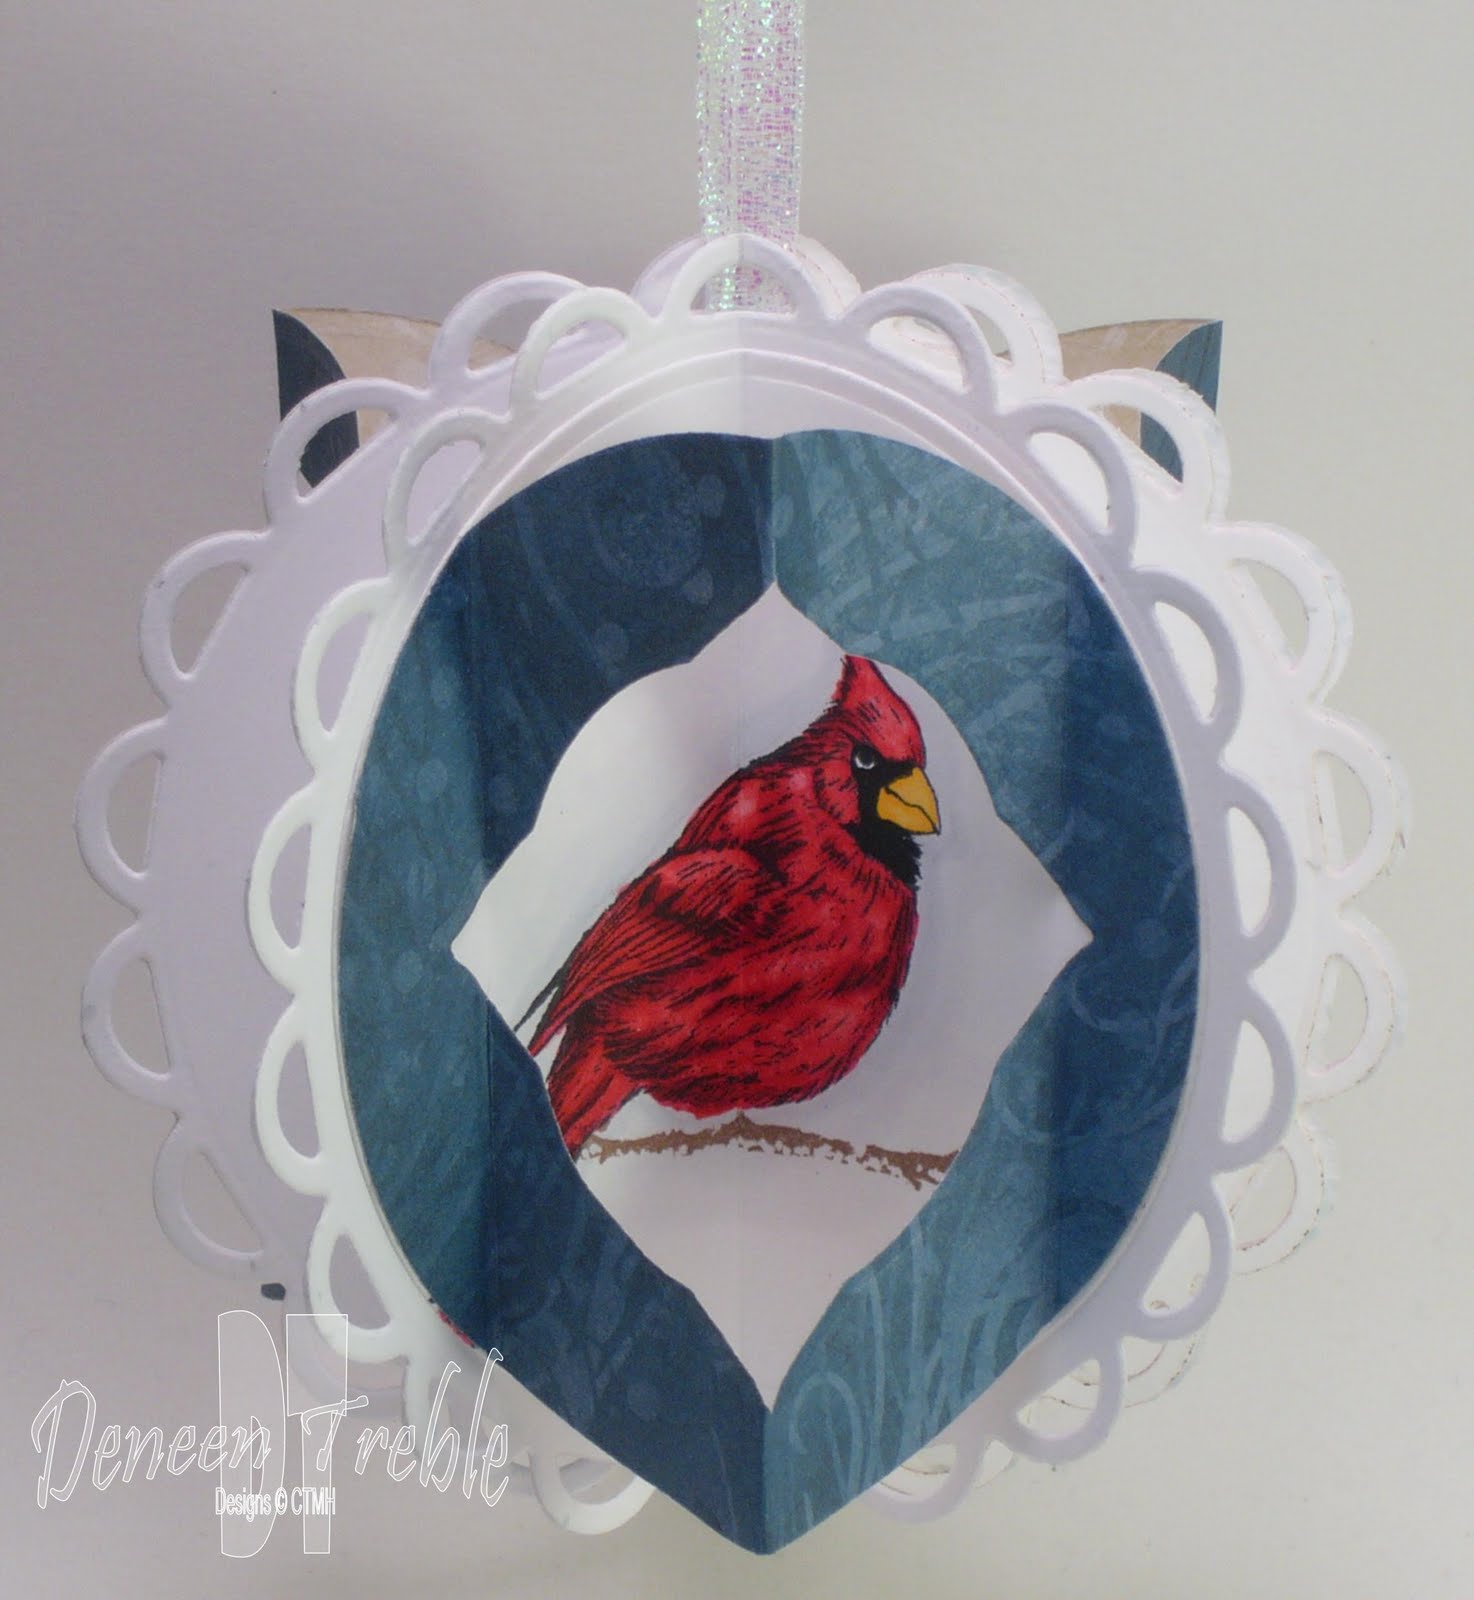
Ornament Size: 4.25"
I kept it simple, seems to be my favourite way to decorate lately. But you could dress it up with pearls, rhinestones, Stickles etc. I used my card idea...found HERE...and the pumpkin idea...found HERE...to come up with the ornament idea, lol:) I used 6 Lacey Circles, and decorated 3 of them. I have the instructions of how I made this ornament a little further down.
I really should have decorated the white space, at least with some embossing. But I was excited with just getting the fancy fold part done that I didn't think about it until after I took pictures of it.
.
Here's a picture looking at it from the top, it shows the fancy fold part.
.
Ornament Pieces
  • 6 Lacey Circles
  • 3 Circles
  • 3 Windows from patterned paper
Instructions
  • Score all pieces in the middle (and the Window along the edge...see photo)
  • Stamp and colour cardinal on 3 Circle pieces
  • Attach 3 Circle pieces to 3 Lacey Circles
  • Join all 6 Lacey Circles>>>alternate Lacey Circle, with Cardinal image Circle....see Pumpkins Post if you need detailed instructions on how to join together.
  • Attach Window pieces to the cardinal circles. (You for sure want to attach the Window AFTER you put the ornament together...trust me:) I did it before, and it was a beast to put together, lol)
Recipe: CTMH PP-Magnifique, CTMH CS-White Daisy, CTMH Ink-Black & Chocolate, CTMH SS-Harmony, Nestabilities-Lacey Circles, Circles & Labels 3, Ribbon, Copics.
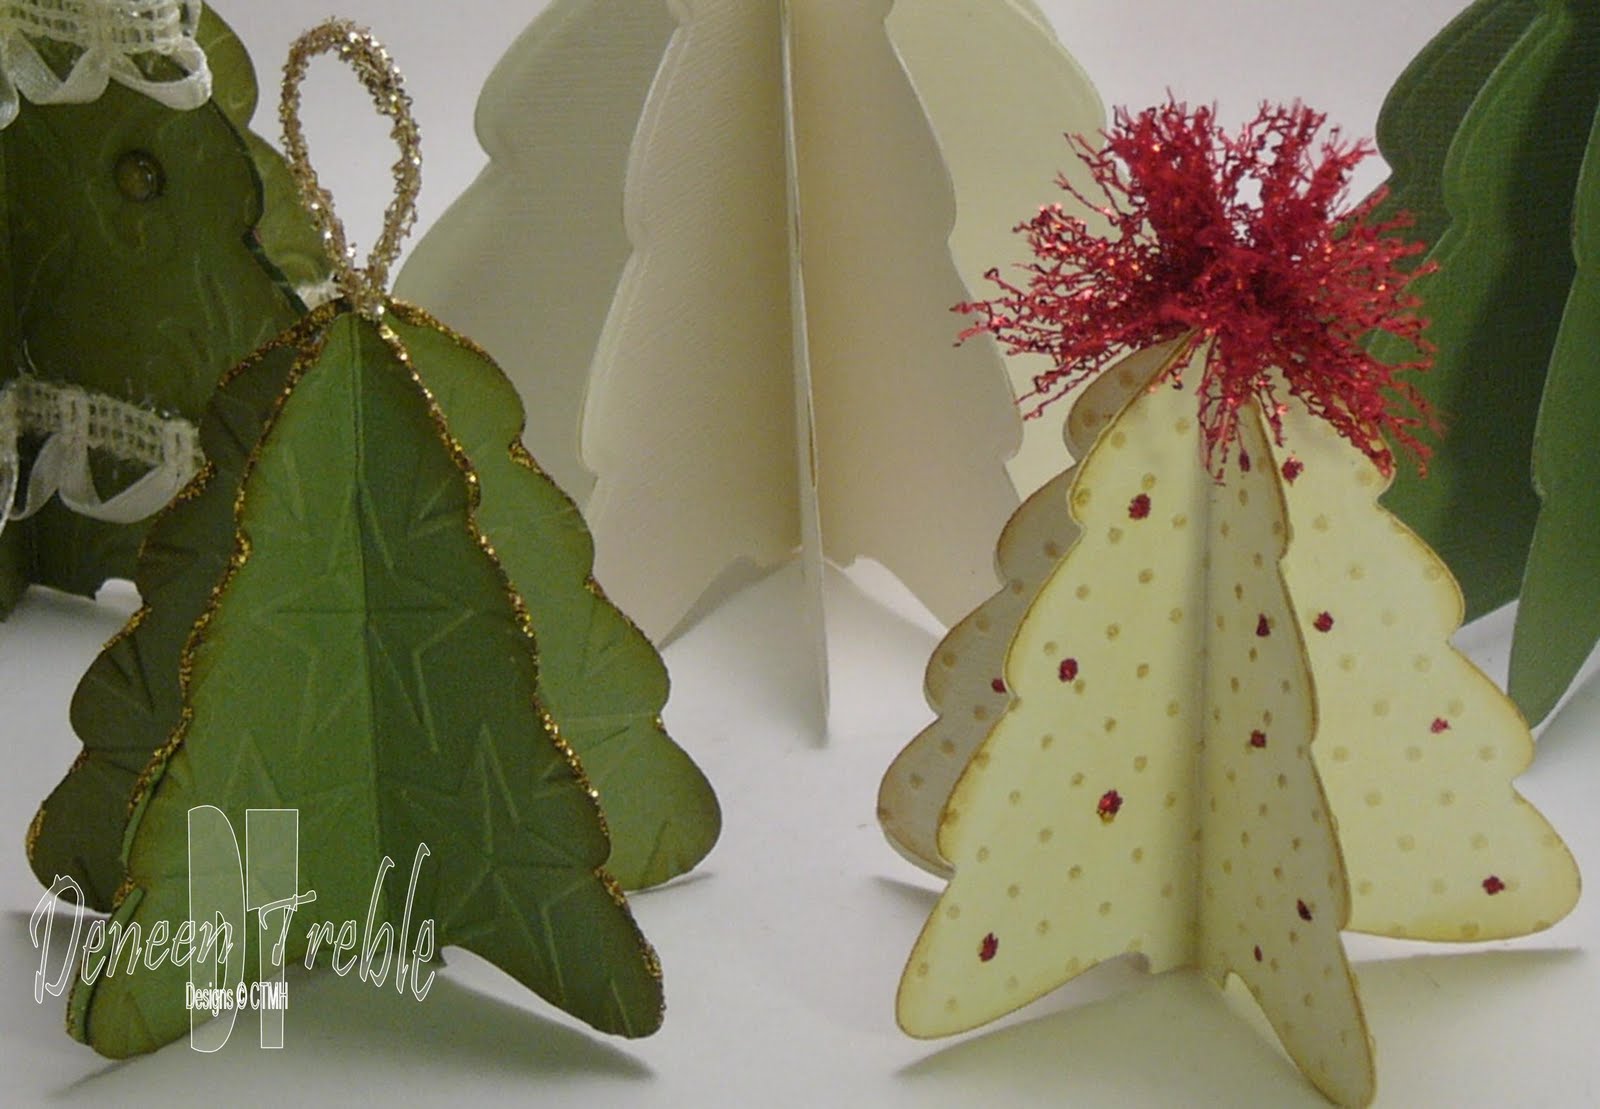
Here are some more ornaments I was inspired to make.

I used Nestabilities Beaded Ovals and Fleur De Lis. I used the Oval and Fleur as a stencil and, Sponge Daubed, and Stipple Brushed CTMH Moonstruck Ink. I only joined 5 ovals together so that you could see the design. (Ornament Size 3.25" x 4.25")
.
I used the largest and 3rd largest Nestabilities Lacey Circle to cut out the ornament shape. I then embossed the 2nd largest Lacey Circle on it. I used 11 Lacey Circles. (Ornament Size 4.25")
This is the ornament that came from the one above...it's the middle section. I lined up the 2 smallest Lacey Circles and embossed the ornament with them. I used 6 Lacey Circles. (Ornament Size 2.75")

.I used the Nestabilities Beaded Oval, and Fleur De Lis.
.

.
I sent American Crafts Mulberry Glitter CS through the Cuttlebug (cut into the cardboard side, not into the glitter side).
.
Why don't you join us this week, we'd love to see what you create! If you're needing more inspiration, be sure to check out the other members of the DT, you can click on their links in my sidebar, or pop on over to Heart 2 Heart Challenges.
Enjoy, and stay warm:)
Deneen

Thursday, December 09, 2010

Some Quick Christmas Cards

Thanks for stopping by today! I have some more $1 cards I made for the Craft Show to share with you.
.
Card Sizes: 4.25" x 5.5"
.
For the moon, I cut a circle out of a Post-It note, attached it (w/ Post-It sticky part) to my CS piece, and then Stipple Brushed CTMH Moonstruck Ink. I then stamped the trees with Black Ink (Penny Black-Snow Dust stamp) and then stamped my sentiment. I used a glue pen to add dots of glue, and sprinkled Prisma Glitter to give the snow some sparkle.
Inside the card I stamped a cardinal from the CTMH SS Harmony.
.
To make the trees look like a forest, I stamped the trees, and then without reinking, shifted the stamp to the right, and then stamped it on the CS again. This is called 2nd Generation Stamping, for those new to stamping:) I then added my sentiment, and some chunky glitter for snow.

.
For this card I embossed the white CS with Cuttlebug's Victoria EF, used Cuttlebug's ornament die on CTMH-Outdoor Denim CS, added a piece of Aluminum Duct Tape (from your local Hardware Store), punched a hole, and then attached the blue CS piece to the card. Very simple, very fast:), perfect for a $1 card!
I also made some cards with CTMH-Petal CS, this was the inside of that card...the only difference is the blue card had blue ornaments inside.
.
I hope you were inspired! Enjoy,
Deneen

Monday, December 06, 2010

Photo Holders using a Binder Clip

It's Monday again:) Time for a Heart 2 Heart Challenge. This week the Challenge is Gift Items - No cards. I thought it was the perfect time to share my Photo Holders with you. They make a great stocking stuffer, they'd be perfect for an office desk, or as a recipe holder!

.
I made some for the Craft Show I was at, but in all the hub-bub I didn't take pictures of the first set. Lucky for me a lady ordered 25, so I made sure to take pictures this time. And just in time for the challenge too! I sold them for $1, and hoped people didn't think that was too much for a binder clip, they ended up selling very well.
Recipe: CTMH PP-Magnifique, CTMH Mini-Medley Accents-White Daisy, Pearls, Dollarama Lace.
.
Here's what one looks like with a 4x6 photo in it. (That's Spencer! my guy:))

.
Recipe: CTMH PP-Bella, CTMH CS-Colonial White, Martha Stewart Punch, Prima Flowers, Dollarama Paper Covered Wire, Purple Grosgrain Ribbon.
.
Recipe: CTMH PP-Silhouette, CTMH CS-Black, Martha Stewart Punch, Pearls, CTMH Satin Edge Colonial White Organdy Ribbon.
.
Recipe: CTMH PP-Top Stitch, CTMH CS-Sky, CTMH Mini-Medley Accents-White Daisy, Michaels Ribbon, Brown Loop Ribbon.
.
Recipe: CTMH PP-Veranda, Prima Flowers, Pearls, Dollarama Lace, Green Grosgrain Ribbon.
.
To attach the strips of paper...I go right around the binder clip...(and the lace/ribbon, flowers etc.), I used Sookwang double-sided tape. It comes in many different widths. Very sticky!! Very reasonable. Sharon at the Scrapbook Cottage got me hooked on it. Thanks Sharon:)
These are the 4 widths I use the most 1/8", 1/4", 1/2" and 2.5".
.
So why don't you join us this week on Heart 2 Heart Challenges. If you're needing more inspiration, check out the other creative gift items by the DT, you can click on their links in my sidebar, or head on over to H2H. We'd love to see what you create, just publish to your blog or other public forum, and then head on over to H2H and add your link.
.
Well, I only have 1 more challenge as part of the DT at Heart 2 Heart, and then a new group of ladies (and possibly gentlemen) will take over! I really enjoyed my time on the team:)
.
Enjoy, and thanks for stopping by,
Deneen

Wednesday, December 01, 2010

3D Christmas Trees

It's hard to believe that December is upon us. I thought I would share these cute trees I made from Spellbinders 2010 Holiday Trees set.
.
Sharon, from the Scrapbook Cottage, suggested them after she saw the pumpkins. I used cream and green CS, cut the trees out (5 for each tree...to show off the embossing), embossed some of them, and then scored them down the middle. I finished some of them off with distress inks, pearls, rhinestones and ribbon. I added Stickles to some of the stars.

The biggest Tree measures approx. 4" high, the medium Tree measure approx. 3.75".
.
Here are some close-up for you to enjoy:


.
These next 2 trees I used 9 trees to give it a fuller look.
Here's a top view of the tree:

.
Here's a close-up of 2 of the smaller trees. Again, I used more trees for the un-embossed green tree.
.

I loved making them, the hardest part is deciding how to decorate the trees! There are so many options.
.
Enjoy, and thanks for stopping by,
Deneen

LinkWithin

Related Posts with Thumbnails