Showing posts with label H2H Challenges. Show all posts

Saturday, January 29, 2011

Time To Get Wild H2H Challenge

Just sneaking in here for the H2H Time To Get Wild Challenge, before the deadline tonight. The challenge was to create something that features an animal or bird (insects are okay too). This card was inspired by one I saw on someone's blog (so if it's you, please let me know, I would like to give you credit).
.
Card Size: 4.25" x 5.5"
I loved the colour combination of blue and brown, and of course cream. Sweet and simple.
Recipe: CTMH CS-Cocoa, Sky & Colonial White, CTMH Ink-Black, Chocolate & Bamboo, CTMH SS-Harmony, Live Inspired & Wings Workshop SS, CTMH Markers-Buttercup & White Daisy, Nestabilities-Labels 4, Dark Brown Satin Ribbon, Pearls, Copics-W1 & W3, Foam Squares.
.
Hope you're having a great weekend.
Deneen

Tuesday, January 25, 2011

H2H Challenges, A Card and My Desk

Hellllloooooo {said like Mrs. Doubtfire} For those of you who have seen that {ahem} older movie. Sorry I haven't posted sooner, I have a ton to share with you too. I'll probably post each day, just to catch up. We got a new computer, and not all the programs made it onto the new tower. Grrrr, especially my photo imaging program. It seems to be somewhere in the depths of the computer, but I don't know how to get to it. So, while we wait for our friend to drop by and fix that, I couldn't hold off any longer, and had to learn a new photo imaging program. The photos seem almost over exposed now. You can barely see my watermark. Maybe my photos were too dark before, and I just didn't notice, because it seemed normal to me. Anyways here they are.
.
Anyhow, please, please, let me know if this editing is really awful on the eyes, or if it's just fine.
.
The first photo is for the Heart 2 Heart Colour Challenge. They've changed things up a bit over there, and you have until the end of the month to get your entries in. And look at that, the end of the month is THIS week. The colours to use are: Sky, Pear, Colonial White &/or Sorbet. You can click on the link just above, to see the colours if you need.
.
Card Size: 4.25" x 5.5"
I used Damask Tiles for the background, because it is a busy pattern, kept the other items fairly simple. The butterfly is embossed with Clear EP, and the wings are raised with Foam Squares. I was in a hurry, and didn't think about getting a close-up.
.
Recipe: CTMH CS-Colonial White, Sky & Pear, CTMH Ink-Sky, Pear, Black & Outdoor Denim, CTMH SS-Damask Tiles & Find Your Style, Foam Squares, Nestabilities-Squares & Lacey Squares, Versamark, Clear EP, Pearls, Satin Edge Organdy Ribbon.
.
The 2nd H2H Challenge is sharing how you organize your schtuff. Well, that was easy to get in almost 1 shot for me, lol. {with a Vanna White pose} Tadah, here it is. Okay, once you pick yourself up off the floor from laughter, you'll see that I'm actually quite organized, really, or maybe you can call it an organized mess:)? Maybe you'll see something that you can incorporate in organizing your space. Ppffffft, yeah, nice try Deneen:) If you dare, read on.


First off are the drawers (which I bought at different times, hence the different colours, yes, it bugs me that they're not all the same colour) that I store finished cards, flowers, ribbon, and excess product that I wouldn't use everyday in (the little container is scraps that my girls love to pick through. All my CTMH B&T paper sits vertically, within reach of my desk. My stamps are stored in a 3-drawer container (that I wished I had picked up 2 of, when I had the chance, because now I can't find them that size), you can see the top of it in the bottom right hand corner. My Spellbinders are sitting in front of it at the moment. On top of my stamps sits a container for my blocks, sponges, sponge daubers, embossing powder, chalk, yup it all fits in there:) And on top of that is one 12x12 container that holds non-CTMH paper:) P.S. The quilt made by my Gramma (a good 40 yrs ago which she used to cover her hope chest), covers my hope chest made by my dad:)
.
In the 2nd photo you can see my itty-bitty desk space (only because I have no where to keep a file of all the ideas I want to try, and so I share the front right corner with it). My Copics, CTMH Markers & Inks, and Stickles, sit nicely above my desk space. My CS is stored in the 12x12's on the right hand side of the photo, yup, it goes from almost the floor to just out of camera range. I fit 1/2 a season in each drawer, starting with Spring-Harmony, then Spring-Blossom etc. My brads, pearls, rhinestones, white CS scraps, and eyelets sit in the white container on my desk. And just at the edge of the photo on the right side, I store adhesive, 2 1/2 drawers of punches, 2 drawers of more stamps, and a drawer for my double scrubber and other misc. items. I almost forgot to say that my Cuttlebug, and folders sit on a stool in the space just to the right of my desk. I'm actually sitting on our bed to take the picture, lol.
.
Phew, if you read all that, way to go! Thanks for taking the time to check out my crafting space.
.

I'll see ya tomorrow,
Deneen
Monday, December 13, 2010

Christmas Ornaments using Nestabilities

Welcome here on this chilly morning, today the high is suppose to be -17C (1F), but the windchill is going to make it feel like -35C (-31F), just a tad bit cold:) Welcome winter, lol.
.
This is my last challenge as part of the Heart 2 Heart Design Team for this term. It's been alot of fun sharing with you all, and being part of a team of other great paper creators:) Thanks Mary, for putting so much into the Heart 2 Heart Challenge Blog and making it run so smoothly! And thanks to all who play along, and who are inspired by the Challenges. I look forward to being surprised on Monday's with the rest of you.
.
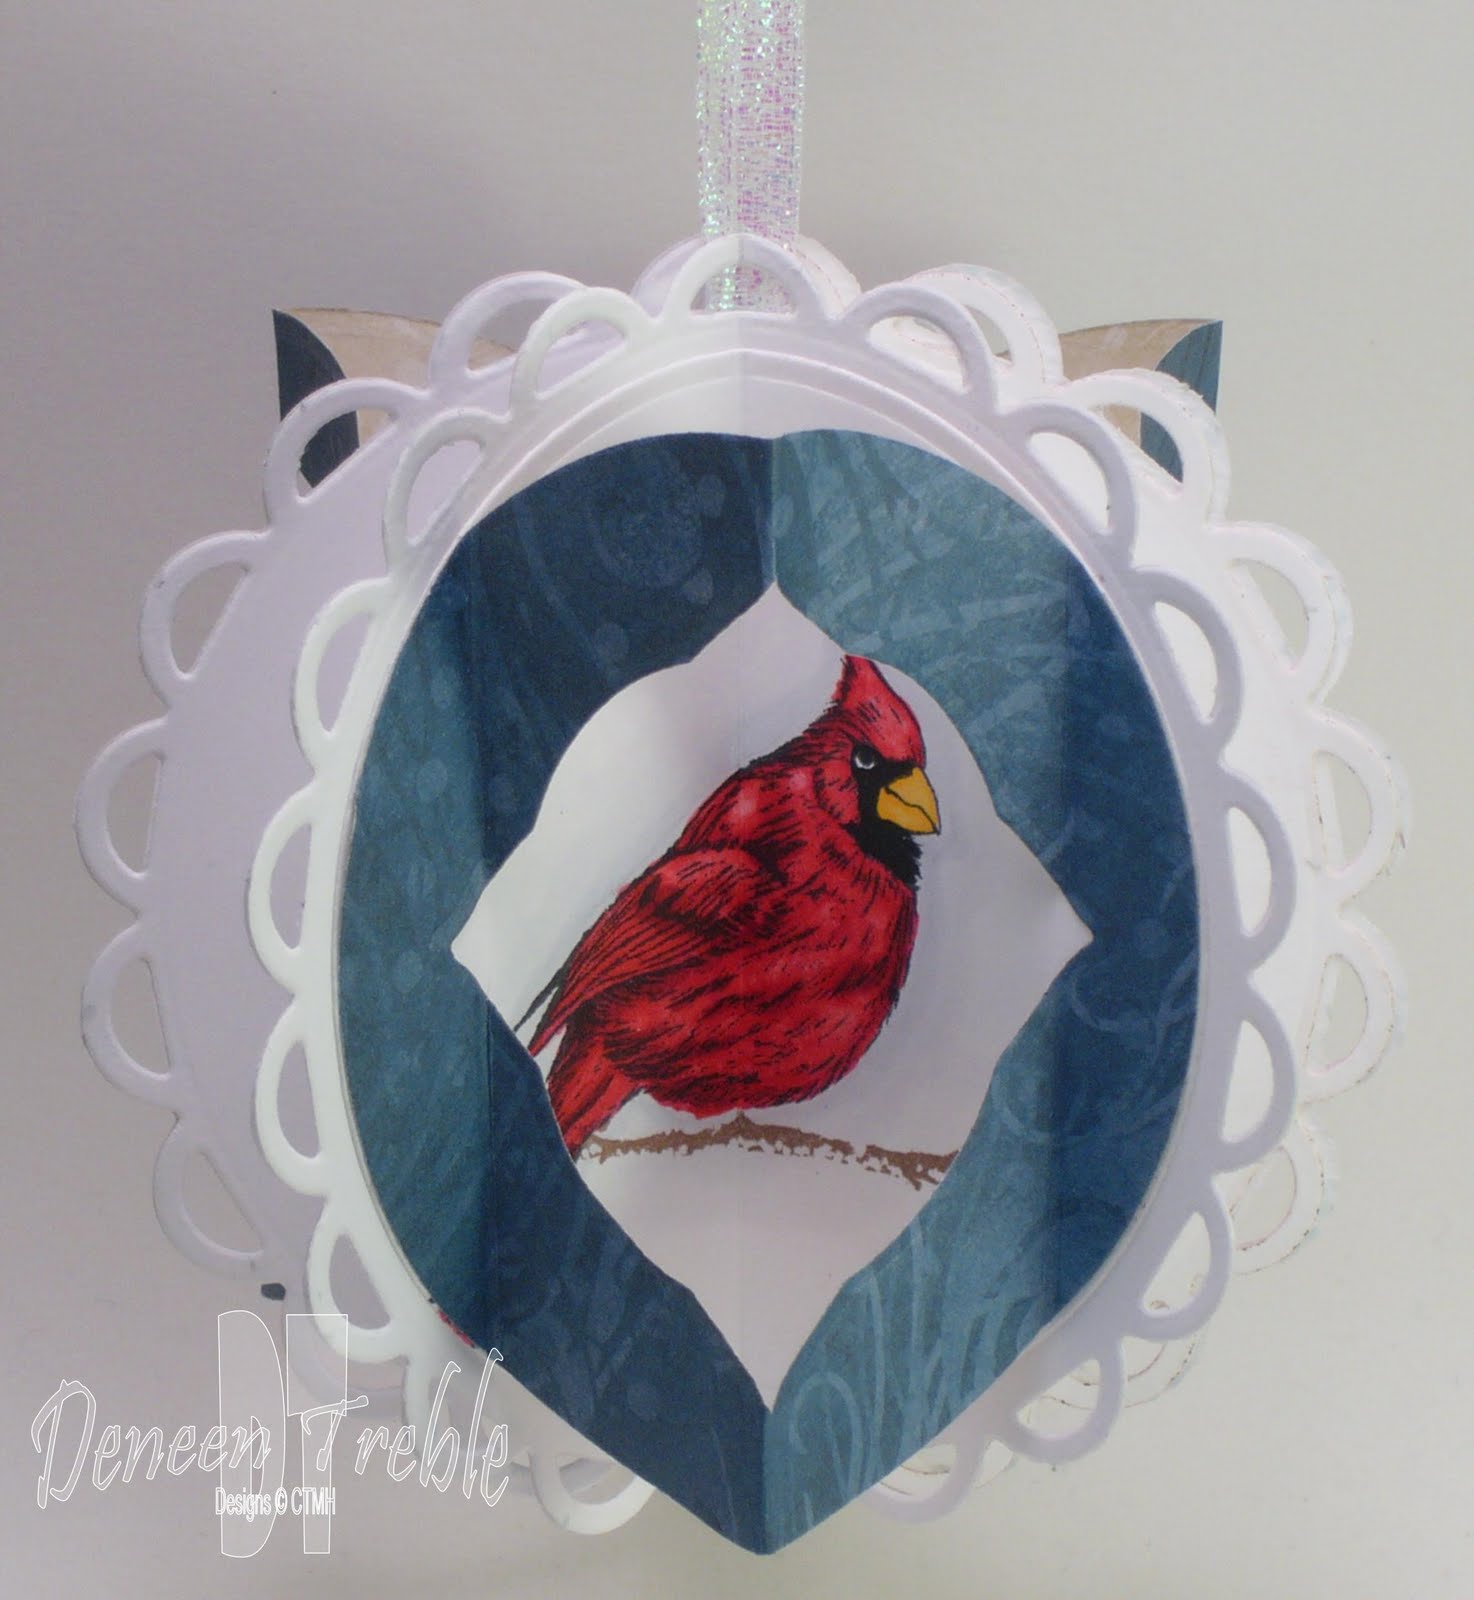
For my last Challenge as DT member I was a bit of a rebel, lol:) The Challenge is Holiday Cards- Christmas, Hannukah, New Year's etc. When I first read the Challenge I didn't see 'cards', so I made a Holiday item...an ornament.
.
Ornament Size: 4.25"
I kept it simple, seems to be my favourite way to decorate lately. But you could dress it up with pearls, rhinestones, Stickles etc. I used my card idea...found HERE...and the pumpkin idea...found HERE...to come up with the ornament idea, lol:) I used 6 Lacey Circles, and decorated 3 of them. I have the instructions of how I made this ornament a little further down.
I really should have decorated the white space, at least with some embossing. But I was excited with just getting the fancy fold part done that I didn't think about it until after I took pictures of it.
.
Here's a picture looking at it from the top, it shows the fancy fold part.
.
Ornament Pieces
  • 6 Lacey Circles
  • 3 Circles
  • 3 Windows from patterned paper
Instructions
  • Score all pieces in the middle (and the Window along the edge...see photo)
  • Stamp and colour cardinal on 3 Circle pieces
  • Attach 3 Circle pieces to 3 Lacey Circles
  • Join all 6 Lacey Circles>>>alternate Lacey Circle, with Cardinal image Circle....see Pumpkins Post if you need detailed instructions on how to join together.
  • Attach Window pieces to the cardinal circles. (You for sure want to attach the Window AFTER you put the ornament together...trust me:) I did it before, and it was a beast to put together, lol)
Recipe: CTMH PP-Magnifique, CTMH CS-White Daisy, CTMH Ink-Black & Chocolate, CTMH SS-Harmony, Nestabilities-Lacey Circles, Circles & Labels 3, Ribbon, Copics.
Here are some more ornaments I was inspired to make.

I used Nestabilities Beaded Ovals and Fleur De Lis. I used the Oval and Fleur as a stencil and, Sponge Daubed, and Stipple Brushed CTMH Moonstruck Ink. I only joined 5 ovals together so that you could see the design. (Ornament Size 3.25" x 4.25")
.
I used the largest and 3rd largest Nestabilities Lacey Circle to cut out the ornament shape. I then embossed the 2nd largest Lacey Circle on it. I used 11 Lacey Circles. (Ornament Size 4.25")
This is the ornament that came from the one above...it's the middle section. I lined up the 2 smallest Lacey Circles and embossed the ornament with them. I used 6 Lacey Circles. (Ornament Size 2.75")

.I used the Nestabilities Beaded Oval, and Fleur De Lis.
.

.
I sent American Crafts Mulberry Glitter CS through the Cuttlebug (cut into the cardboard side, not into the glitter side).
.
Why don't you join us this week, we'd love to see what you create! If you're needing more inspiration, be sure to check out the other members of the DT, you can click on their links in my sidebar, or pop on over to Heart 2 Heart Challenges.
Enjoy, and stay warm:)
Deneen

Monday, December 06, 2010

Photo Holders using a Binder Clip

It's Monday again:) Time for a Heart 2 Heart Challenge. This week the Challenge is Gift Items - No cards. I thought it was the perfect time to share my Photo Holders with you. They make a great stocking stuffer, they'd be perfect for an office desk, or as a recipe holder!

.
I made some for the Craft Show I was at, but in all the hub-bub I didn't take pictures of the first set. Lucky for me a lady ordered 25, so I made sure to take pictures this time. And just in time for the challenge too! I sold them for $1, and hoped people didn't think that was too much for a binder clip, they ended up selling very well.
Recipe: CTMH PP-Magnifique, CTMH Mini-Medley Accents-White Daisy, Pearls, Dollarama Lace.
.
Here's what one looks like with a 4x6 photo in it. (That's Spencer! my guy:))

.
Recipe: CTMH PP-Bella, CTMH CS-Colonial White, Martha Stewart Punch, Prima Flowers, Dollarama Paper Covered Wire, Purple Grosgrain Ribbon.
.
Recipe: CTMH PP-Silhouette, CTMH CS-Black, Martha Stewart Punch, Pearls, CTMH Satin Edge Colonial White Organdy Ribbon.
.
Recipe: CTMH PP-Top Stitch, CTMH CS-Sky, CTMH Mini-Medley Accents-White Daisy, Michaels Ribbon, Brown Loop Ribbon.
.
Recipe: CTMH PP-Veranda, Prima Flowers, Pearls, Dollarama Lace, Green Grosgrain Ribbon.
.
To attach the strips of paper...I go right around the binder clip...(and the lace/ribbon, flowers etc.), I used Sookwang double-sided tape. It comes in many different widths. Very sticky!! Very reasonable. Sharon at the Scrapbook Cottage got me hooked on it. Thanks Sharon:)
These are the 4 widths I use the most 1/8", 1/4", 1/2" and 2.5".
.
So why don't you join us this week on Heart 2 Heart Challenges. If you're needing more inspiration, check out the other creative gift items by the DT, you can click on their links in my sidebar, or head on over to H2H. We'd love to see what you create, just publish to your blog or other public forum, and then head on over to H2H and add your link.
.
Well, I only have 1 more challenge as part of the DT at Heart 2 Heart, and then a new group of ladies (and possibly gentlemen) will take over! I really enjoyed my time on the team:)
.
Enjoy, and thanks for stopping by,
Deneen

Monday, November 29, 2010

Sketch Challenge Card

Good morning! It's Monday again, time for Heart 2 Heart Challenges. I only have a few more Monday's left as a member of the Design Team. I'll be sorry to leave, but look forward to being surprised on Monday's like the rest of you:)
.
This week it's a
Sketch Challenge. Here's my card based on the Sketch:
Card Size: 4.25" x 5.5"
Recipe: CTMH PP-Mistletoe, CTMH CS-New England Ivy, Cocoa & Colonial White, CTMH Ink-Chocolate & Black, CTMH Markers-New England Ivy, Buttercup, Creme Brulee, Tulip, White Daisy & Grey Flannel, CTMH SS-Snow Days, Prisma Glitter, CTMH Colonial White Satin Edge Organdy Ribbon, Nestabilities-Lacy Squares, Foam Squares, Pearls.

.Here's the Sketch:
.
I used my, new to me, Lacy Squares to make a rectangular mat. I added a touch of colour with my CTMH markers, and finished it off with Prisma Glitter to make the snow sparkle. I love the saying that's with the image, it inspired me to sponge daub chocolate around the edges to give it that vintage feel.
.
If you need more inspiration for this Sketch, check out the other members of the DT. You can find their links in my sidebar, or click over to the H2H blog. We'd love to see what you create with this Sketch! So be sure to link it to the Heart 2 Heart blog.
.
Enjoy,
Deneen
.
P.S. Only 26 more days until Christmas!!!!

Monday, November 22, 2010

A Simple Thank-you Card

It Challenge time again at Heart 2 Heart Challenges. It's Thanksgiving this coming weekend for our friends to the south, and so the challenge is Thanks - In the spirit of Thanksgiving, make a thank-you card.
.
Here is my Thank-you card. I wanted to try out my new Nestabilities Labels Seventeen, and so I kept it clean and simple. I layered 3 different sized organdy ribbons, also used Impressabilities and finished it off with some pearls.
.
Card Size: 4.25" x 5.5"


Recipe: CTMH PP-Verand Creative Basics, CTMH CS-White Daisy, Cocoa & Garden Green, CTMH Ink-Black, Creme Brulee, Garden Green, Chocolate & Bamboo, CTMH SS-A Little Everything & Tender Tags, Nestabilities-Labels Seventeen & Floral Accents, Impressabilities-Flourish, Pearls, Foam Squares, CTMH Colonial White Satin Edge Organdy Ribbon, Organdy Ribbon-7/8" & 1.5".
.
It was a nice break from thinking Christmas. I was hoping to have my new SOTM - A Little Thanks, to show off, but I didn't get it yet so I used A Little Everything. Here's a picture of the SOTM for November:
You can earn it for FREE, find out how by clicking HERE.
If you're need more Thanks inspiration, check out the other great creations by the DT. You can click on their blog links in my sidebar, or head on over to the H2H blog. We'd love to see your Thanks creation, so post it to your blog or other public forum, and then link to the H2H blog.
I'll be sharing more creations I made for the Craft Show this week, so be sure to check back!
Enjoy,
Deneen

Monday, November 15, 2010

Pretty Princess Castle Card

It's Challenge time again!! This week the challenge on Heart 2 Heart Challenges is Pretty Princess - Make it Frilly and Girly!
.
What could possibly be more girly than a princess? Nothing...lol, but I thought a pretty Castle Card would be perfect for a pretty princess. I created the Castle Card Template and posted Castle Card, Template & Instructions about a year ago. (You can click on the link to take you to the template & instructions).
.
Here's the card I created for the Challenge:
This year daughter #2 is turning 9, so this card is for her. The '9' is stamped onto Chocolate CS, and then covered with Prisma Glitter...which photographed greeny instead of sparkly.
I added the balcony by punching the border out of White Daisy CS and curving it. It's difficult to see in the photo. I added a ton of Rhinestones for sparkle, and finished it off with flowers and bows.
Recipe: CTMH PP-Cherry-O & Topstitch, CTMH CS-Blush, White Daisy & Chocolate, CTMH Ink-Outdoor Denim, CTMH SS-Rustic Numbers, Just Blooms Spring Blossoms, Just Blooms White Daisy Variety Pack, Nestabilities Labels 4, Martha Stewart Punch-Rain Drop, Eyelet Lace & Ribbon Loop.
.
Now it's your turn, what will you create that is Pretty Princess? If you're needing more inspiration you can check out the other great designs by the H2H Design Team, their links are in my sidebar, or you can click on over to Heart 2 Heart.
.
I had a great weekend at the Craft Show. I'm planning on sharing photo's of my creations later this week, so be sure to check back!
.
Enjoy,
Deneen

Monday, November 08, 2010

Stocking Gift Card Holders.

Good morning! The challenge this week on Heart 2 Heart Challenges is Shaped Cards - no rectangular or square cards.
.
As you may know, I am super busy trying to finish up cards and projects for this coming weekend's Craft Show. I just happened to be working on these Stocking Gift Card Holders. I found the template at Waltzing Mouse Stamps. I kept them fairly simple since I plan to sell them for $3. Hopefully that's not too much, whatcha think? Too much? I would have like to add faux stitching to the toe and heel, but time-wise (I made 10 of each colour) it was going to take too long.

Recipe: CTMH PP-Aspen L2, CTMH CS-Outdoor Denim, Colonial White & Sky, Cuttlebug Snowflakes EF, Blue Grosgrain Ribbon, Martha Stewart Snowflake Punch, Foam Squares, Rhinestone.
.
Recipe: CTMH PP-That's Amore L2, CTMH CS-Blush & White Daisy, Cuttlebug Victoria EF, Martha Stewart French Scroll Border Punch, White Grosgrain Ribbon.
.

.
Recipe: CTMH PP-Sorry, couldn't find it, it's an older one:), CTMH CS-New England Ivy & Colonial White, Cuttlebug Argyle EF, Prima Holiday Poinsettia, Rhinestone.
.
.
Recipe: CTMH Petal B&T Paper, CTMH CS-Petal & White Daisy, Cuttlebug Seeing Spots EF, Corner Rounder, Copics-V09, Snowflakes (Dollarama), Purple Stickles.
.
So join us this week on H2H Challenges, we'd love to see what you create that's shaped! For more inspiration check out the awesome creations by the DT members, their links are in my sidebar, or click on over to H2H.
.
I plan to share some of the things I have been making for the Craft Show with you, as soon as I have a chance to sit down:)
.
Enjoy,
Deneen

Monday, November 01, 2010

Colour Challenge Card

Can you believe it's November already? It also happens to be Monday and that means it's challenge time on Heart 2 Heart Challenges. Whew, this was a tough challenge for me this week. I'm already making Christmas cards for a Craft show in 2 weeks, so my brain was working on different colours. The challenge colours are Sunset, Brown Bag and Indian Corn Blue.

.
Card Size: 4.25" x 5.5"
Recipe: CTMH CS-Sunset, Indian Corn Blue, Brown Bag and White Daisy, CTMH Ink-Black, Sunset and Chocolate, CTMH SS-The Present, White Grosgrain Ribbon, Pearls, Foam Squares, Nestabilities-Labels 4 and Flourish Accents, Cuttlebug Victoria EF, Martha Stewart Layered Arches Border Punch.
.
For more inspiration check out the great Colour Challenge creations by the other members of the DT. You can see them on the Heart 2 Heart Challenges blog.


Thanks for stopping by,
Deneen

Monday, October 18, 2010

Super Simple Speedy Christmas Cards:)

Do you think I could fit any more 's' adjectives in the title, lol? It's challenge time again on Heart 2 Heart Challenges. This week it's
Embossing - Add dry, or heat embossing on your project.

.
I saw a card like this in PaperCrafts - Holiday Cards, and knew it would be a great card to make a lot of. I made a total of 36 cards in 3 different colours. I plan to sell them for $1.00 at a craft show next month, so they needed to be quick, easy, elegant cards.
Card Size: 4.25" x 5.5"
.

.

Recipe: CTMH CS-White Daisy, Outdoor Denim & Petal, Blush & Chocolate, Vineyard Berry & Spring Iris, CTMH Ink-Black, Outdoor Denim, Chocolate & Vineyard Berry, CTMH SS-Everlasting Life, Snow Days, Greeting Tree, Holiday Joy &Christmas Greetings, Satin Ribbon-Michaels Arts & Crafts, Cuttlebug EF-Snow Dots, D'vine Swirl & Victoria.
.
For more inspiration be sure to check out the awesome samples by the rest of the DT. They're links are in my sidebar, or head on over to H2H to see them. As I type this up late Sunday night, we are 2!!!! away from the 4 for 40, how exciting is that!! So be sure to check H2H to see if there is going to be a random draw for 4 of Jessica's cards. If you joined in the challenge and linked your creation, it could be you:)
.
Why don't you join us this week and show us your embossed project. Post your creation to your blog or other public forum, and then add your link at Heart 2 Heart Challenges.
.
Enjoy,
Deneen


Monday, October 11, 2010

A Card with Leaves - H2H Challenge

Happy Thanksgiving Day (for us Canadians).
Hope my fellow Canadians are enjoying family time, and thinking of all we have to be thankful for!
.
Here I thought I'd have more time to work on cards after last weekend, {sigh} time seems to have a way of getting away from me, I can't believe another week has gone by and I haven't posted anything. I've been busy trying to get cards done for a November Craft Fair, I'll eventually get around to taking pictures, and posting for you to enjoy.
.
This week on Heart 2 Heart Challenges the challenge is Trees and Leaves - create a project that incorporates trees and/or leaves.
.
Card Size: 4.25" x 5.5"
Here is the card I created to inspire you.
I clear embossed the leaves. For the orange leaves I sponge daubed Sunset onto the leaf, and then rolled the stamp edges on the Sunset stamp pad, then stamped my image onto the CS. I then covered the leaf image with clear embossing powder. The image stays moist enough to hold the embossing powder and when heated, leaves a nice bumpy look.
Recipe: CTMH PP-Olivia, CTMH CS-Garnet, Cocoa, Colonial White & Sunset, CTMH Ink-Chocolate, Garnet, Cocoa, Honey, Sunset & Black, CTMH SS-Timeless & The Present, Clear Embossing Powder, Foam Squares, Pearls, Martha Stewart Rain Drop Corner & Border Punch, CTMH Satin Edge Colonial White Organdy Ribbon, Nestabilities-Fancy Tags.
It's a 4 for 40 week on H2H, that means if we reach 40 players, one lucky winner will receive 4 handmade cards by Jessica. So why don't you join us this week, we sure would love to reach 40 players! If you're needing more inspiration, be sure to check out the fabulous creations by the other DT members, their links are in my sidebar, or click on over to the Heart 2 Heart blog.
Enjoy your pumpkin pie,
Deneen

LinkWithin

Related Posts with Thumbnails