Showing posts with label Liquid Glass. Show all posts

Sunday, November 25, 2012

Craft Show Goodies

Hello and welcome here!  I thought I would share a few things I made for the Craft Show here in town.

Moving left to right:  Journals-$7, Mini Notebooks-$3 or 2/$5, behind them are the Giant Clothespins which can be used as photo holders or recipe card holders etc. $3 or 2/$5, Mini Photo Holders (from large binder clips) $1, my handmade cards-$3 or 4/$10 (these are the cards that I post on my blog)

On a small table to the right of the big table:  my girls helped make Magnets-$0.25, and Hemp Bracelets-$2...they got to keep any money made from selling these.  And finally my $1 Christmas cards, and Clearance cards-$1.

Here's a full cookie sheet full of magnets, we started with a total of 350 magnets (not all fit on the front)

This is what we started with on the 2nd day...and we sold all but 6, which we are now using on our fridge!

I don't have a closeup of the magnets, but we punched circles out of pattern paper...you can see Mickey Mouse, soccer balls, music notes were gone the first day....we then added a drop of CTMH Liquid Glass, also known as Glossy Accents etc., and centered the stone (clear vase filler stones, they're flat on one side and rounded on the other) on the paper.  We let them dry overnight and then added a drop of Liquid Glass to adhere the magnet to the back.  I found out that there are different strengths of magnets...I bought some at Walmart (which in the end ended up being too big anyways), and some from Michaels.  The ones from Michaels were smaller, but they also were quite a bit stronger than the larger ones from Walmart.

The reason I sell my Christmas cards for $1 is because many people like to buy multiples at this time of year, so I try to keep it affordable for them and for me.  I don't layer and add a whole lot of embellishments like I normally do, but I keep them Clean and Simple, and I think elegant at the same time.

Card Size: 4.25" x 5.5"
 
I used Cuttlebug's Heritage embossing folder on green CS, and gold embossed the poinsettia (from Our Daily Bread called Blessed Christmas) onto cream CS, I finished it off with a bit of gold Stickles in the corners.
 Inside:

Card Size:  4.25" x 5.5"
I embossed the cream CS with Sizzix Raspberry Frame, I gold embossed the word 'Joy' (CTMH Baroque Alphabet) onto cream CS, and then matted 'Joy' and the card with red CS, I finished it off with a piece of knotted red grosgrain ribbon.
The gold embossing reflects nicely.

Inside:

Keep checking back, I have lots more to share from my Craft Show.
Enjoy,
Deneen

Thursday, July 07, 2011

2 More Flower Soft Cards

Just a quick post to share the last 2 Flower Soft cards I made when I was preparing for a class. We made the first one in class. And the other one I wanted to try out the Flower Soft wires, and I used Liquid Glass/Glossy Accents on the bottles. I didn't think to take a picture of the bottles with the light shining off them before I gave it away.

Card Sizes: 4.25" x 5.5"


I coloured the bottles with Copics (and because I was just experimenting, I didn't keep track of which ones I used.) Because the one card was going to be used in class, I kept the colouring fairly basic since many ladies haven't used Copics before. The stamp is from Inkadinkado.


I stamped the image and cut around the bottles, and cut the 2 flower bouquets off so that I could add wire flowers instead. I attached it to the card with Foam Squares so that it has a 3D appearance, and looks almost like they are sitting on a mantle.


Enjoy,

Deneen

Wednesday, August 25, 2010

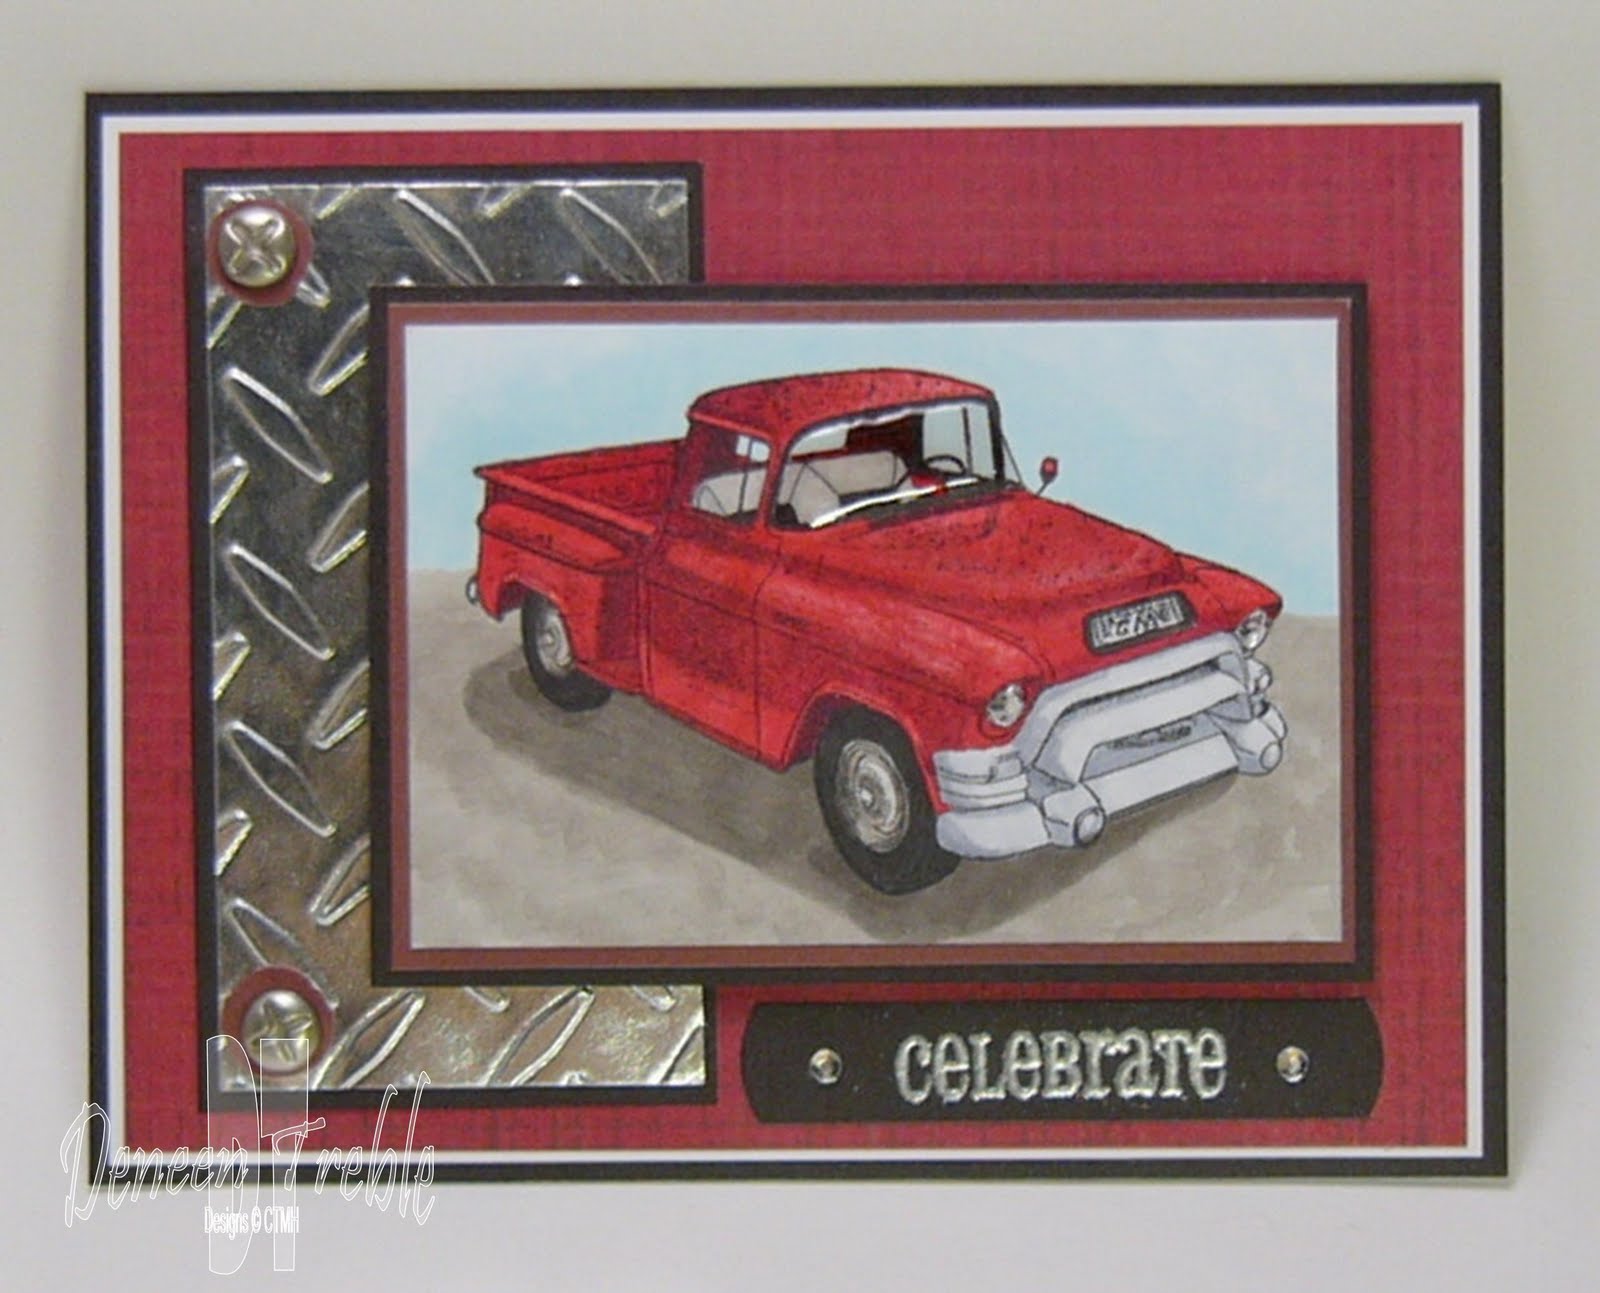
1955 GMC Truck, for the Guys!

Welcome here!! This card has a looonnngggg history, which I'll try to make short:) I saw THIS card on Vicki's blog back in January, but I didn't have the same stamp set, so I put the idea on the backburner ('Cause ya know, guy cards are hard to come by). In April, I saw this GMC Truck at the LSS, but wasn't sure if I would use it. Well, when I finally decide I NEEDED it, it was gone!! In the meantime the LSS had a Garage Sale in July and I found this paper...with this card in mind. The truck came in shortly after, and VOILA!!! I finally finished my card that began in January. Phew, what a trip, but definitely worth the wait.
.
Card Size: 4.25" x 5.5"
.
The paper is a deeper red IRL, not sure why it looks a little washed out. I coloured the truck with Copics, and added CTMH Liquid Glass to the windshield and headlights. I used Aluminum Duct Tape for the 'metal' piece (sent through the Cuttlebug with the Diamond Plate EF). I finished the card off by silver embossing 'Celebrate'.
.
Here's the Aluminum Duct Tape (found at the hardware store) being shiny. I found if I attached the Duct Tape to CS, and then sent it through the Cuttlebug, it holds it shape better, than if you just sent the Duct Tape through the Cuttlebug on its own.
.
Here's what a roll looks like, if you haven't seen it before. It already has adhesive on it, you just peel off the backing and stick it where you want.
.

.
Recipe: Patterned Paper-?, CTMH CS-White Daisy, Black & Garnet, CTMH Ink-Black, CTMH SS-Say It In Style, Cornish Heritage Farms-1955 GMC Truck, VersaMark, Silver EP, Cuttlebug Diamond Plate EF, Aluminum Duct Tape, Rhinestones, Brads, Foam Squares, Liquid Glass, Copic Spica-Clear, Copics-R27, R46, W3, W5, W7, C00, C3, BG0000, O.
.
Enjoy,
Deneen

Sunday, July 25, 2010

Washer Pendant Necklaces & Keychains

Haley Dyer shared some awesome Washer Pendant Necklaces, and also made a Tutorial on how she made them....you can find her Tutorial HERE! Thanks so much Haley for sharing!!

.
I did one thing different than Haley's instructions...I cut my circles a little bigger than my washers, spread the glue, let them dry, and then trimmed them. It was easier than trying to fit the cut circle onto the washer with glue-y fingers. I trimmed the outside edge with scissors (and then filed them), and the inside circle I used myX-acto knife. Hopefully you've read Haley's instructions, otherwise what I'm saying is all Greek to you, lol:)

.
Here are my Pendants!!
They measure about 1.5" wide, and I bought the thick and the thin washers (I got to the store and stood there for a while trying to decide...thick or thin?) The thicker ones ended up being easier to work with, so I went and bought some more.


Aren't they the sweetest thing you've seen? I see that they've been around for a while, but I didn't get the memo, lol:( So I'm really enjoying them now.
.
The decisions one has to make. It sort of like the candles I made...so many ideas, so few washers:) First one has to decide what papers to use, then there's how to go about decorating them. And then...how to go about finishing them off to go around your neck. I need to do a little research on jewellery making so that I can finish them off nicely. For now, they will be tied around the neck...I did finish the ends with Liquid Glass, or a match to melt it, so that it won't fray.
.
Here's some more to enjoy! Haley!!! Look what you started, lol.
.

.
I also thought they'd be great as keychains! So here were 2 I did.
.
Again, a big thank-you to Haley for sharing her instructions and for the inspiration! If you have any questions on how I made mine, feel free to ask!
.
{Edited to add the following}
I have added a short Tutorial on how I add a 'clasp' to the Pendants, just click HERE.
.
Bobie asked me how I tied off the keychain. I thought I would try in words...but a PICTURE is worth a thousand words, so here's a picture of how I knotted the pendants, and how I tied the keychain. Hopefully it's helpful! Thanks for asking Bobie.

I should mention that for the keychain, I finished it off with a regular knot that I applied Liquid Glass to, to keep it from opening. I'm researching a slip knot for the Pendant Necklaces (to make them adjustable!)

Enjoy,

Deneen

Monday, March 15, 2010

Gift Bags - Part 2

Well, I made 4 more gift bags, I couldn't resist making another Easter one, plus a masculine, a boy, and a girly one. The instructions, and the first set of gift bags you can find HERE.
.
For this one, you don't need to score the middle of the sides. Just add a handle, and you have a basket.
Just another view of it from the front.
.
Recipe: CTMH CS-White Daisy, Lilac Mist & Sweet Leaf, CTMH Ink-Spring Iris, Black, Grey Flannel, Sweet Leaf, Petal & Blush, CTMH SS-Eastertime & Easter Eggs, Nestabilities-Scallop Circles & Standard Circles, Martha Stewart Punches-Pinking Scallop Border & Eyelet Lace Corner, CTMH Square Chocolate Brad, 3D Foam Squares, Transparency.

.

Here's the masculine gift bag. Instead of having a window in the front, I added an image. I finished off the top with some Copper Brads. I'm really pleased with how it turned out. I added some 3D Foam Squares behind the blue frame, it really seemed to make the image 'pop', which I coloured with pencil crayons.
.
Recipe: CTMH PP-Majestic Blue, CTMH CS-Desert Sand, Outdoor Denim & Colonial White, CTMH Ink-Black, Cocoa & Chocolate, CTMH SS-Beautiful Things & Say It In Style, Nestabilities-Labels Two & Double Ended Tags, 3D Foam Squares, Pencil Crayons, Copper Brads, Natural Hemp.

.

I hadn't had a chance to use my CTMH Topstitch papers yet, and thought this would be the perfect opportunity. For the bird, I tried a technique that CTMH Sista Patricia Poole used. I inked up the stamp by sponge daubing CTMH Chocolate Ink onto the top part of the bird, and then sponge daubing CTMH Blush Ink onto the chest section of the bird.
.
Recipe: CTMH PP-Topstitch, CTMH CS-Colonial White, Baby Ink, Sweet Leaf & Cocoa, CTMH Ink-Chocoalte, Blush, Honey & New England Ivy, CTMH SS-A Tweet, Martha Stewart Punch-Eyelet Lace Corner & Border & Grass, Nestabilities-Standard Circles & Classic Scallop Circles, Pearls, 3D Foam Squares, Transparency, Rhinestone.

.

Here's the boy one...it was alot of fun to make, I especially like the frog coming out of the window. I used the retired CTMH Blue Jeans SS as a pocket for the gift bag closure.
For the 'snap', I used Liquid Glass to give it a realistic look.
.
Recipe: CTMH PP-Tinkerin', CTMH CS-Holiday Red, Honey, Baby Blue, Sweet Leaf & Desert Sand, CTMH Ink-Chocolate, Olive, New England Ivy, Outdoor Denim, Black & Grey Flannel, CTMH SS-Blue Jeans & Fun Times, Nestabilities Standard Circles, Martha Stewart Punch-Double Loops Corner, Transparency, Googly Eyes, Liquid Glass.
.
Enjoy,
Deneen

Monday, March 01, 2010

Covered Journal

Happy March!! I can't believe how time flies, it's March already.

Today I have a notebook that I covered to share with you. I covered it a while ago, but the image...a butterfly...got kind of lost, so I pulled it off, and worked with the colours (I didn't remove the flower paper or corner pieces) to create a title for my journal. I am really pleased with how it turned out, I especially love the boldness of the title, because prayer is so powerful. This is the journal I take with me to Cell, and where I write down prayer requests for others.

After stamping the word 'power', I covered it with Liquid Glass to give it shine and dimension. I also used Prisma Glitter on the letters of 'prayer'.
Recipe: CTMH PP-Emporium, CTMH CS-Twilight, Colonial White & Black, CTMH Ink-Twilight, Black & Vineyard Berry, CTMH SS-Baroque Alphabet, Rustic Alphabet, Precious Alphabet & Faith, Liquid Glass, 3D Foam Squares, Pencil Crayons, Prisma Glitter.
Enjoy,
Deneen

Monday, September 28, 2009

Castle Card, Template & Instructions

I am so excited to share my card with you today. I had seen a castle book in the Sept. '09 issue of Beautiful Cards (pg.35). You buy the book and embellish it. Well, I figured maybe I could make a template for one...why buy it if I can make it...then I could share it with you all.


And here's my card:
Card Size: 8.5" x 5.5"


Isn't it just the coolest thing!!?!! I'm so excited, and pleased with how well it turned out....flowers, glitter and rhinestones oh my.


Here's the one side open. I didn't embellish much on the inside because I didn't want things to get squished when it was closed for delivery.


Here's the other side. (I have yet to add my name and other info to the back page.)

Here are some close-ups of the details.
For the number, I stamped the '9' on CTMH Blush CS, covered it with Liquid Glass and then added Prisma Glitter...it looks like chipboard...I attached it with Foam Squares.


The roof is also covered with Prisma Glitter, I followed the swirl pattern on the paper.


Here's a view of all the glitter glittering away.
Recipe: CTMH Paper Pack-Daydream, CTMH CS-Blush, White Daisy & Outdoor Denim, CTMH Ink-Blush, Outdoor Denim, Black & Vineyard Berry, CTMH SS-Doodle Alphabet, Atomic Caps, Atomic Lowercase, Card Commentary & Rustic Numbers, Galaxy Marker Pink, Liquid Glass, Prisma Glitter, Prima Flowers, Rhinestones, Rhinestone Brads, Nestabilities Labels Four, Martha Stewart Doily Lace Punch.

Now, on to what you've all been waiting for.....
THE TEMPLATES:

Template A measures 8.5" x 11"


Template B measures 3.75" x 11"
THE INSTRUCTIONS:
Step 1
  • Print templates on 8.5" x 11" CS.
  • Cut out castle pieces.
  • Score on dotted lines.
Step 2
  • Overlap Piece B onto Piece A.
  • Glue Pieces together.
Step 3
  • Fold.
  • Embellish.
Enjoy making Castles!!! It sure was alot of fun adding all that glitter!
Enjoy,
Deneen

LinkWithin

Related Posts with Thumbnails