Monday, August 30, 2010

A Fancy Fold Card and Tutorial

Welcome here!! This post is jam packed full of information, so grab your coffee, put a video on for the little ones:), and lets get started!
.
It's Heart 2 Heart Challenge time!!
AND, I'm showing off some NEW CTMH products that will be available to you Sept. 1st. (You can view the new catalogue online on my site HERE, Sept. 1st)
.
Okay...the challenge this week on H2H is Fun Folds. Create a project that includes a fun fold...easy right?!! The difficult part is choosing what fun one you want to do...there are so many to choose from, lol!
.
Card Size: 4.25" x 5.5"
.
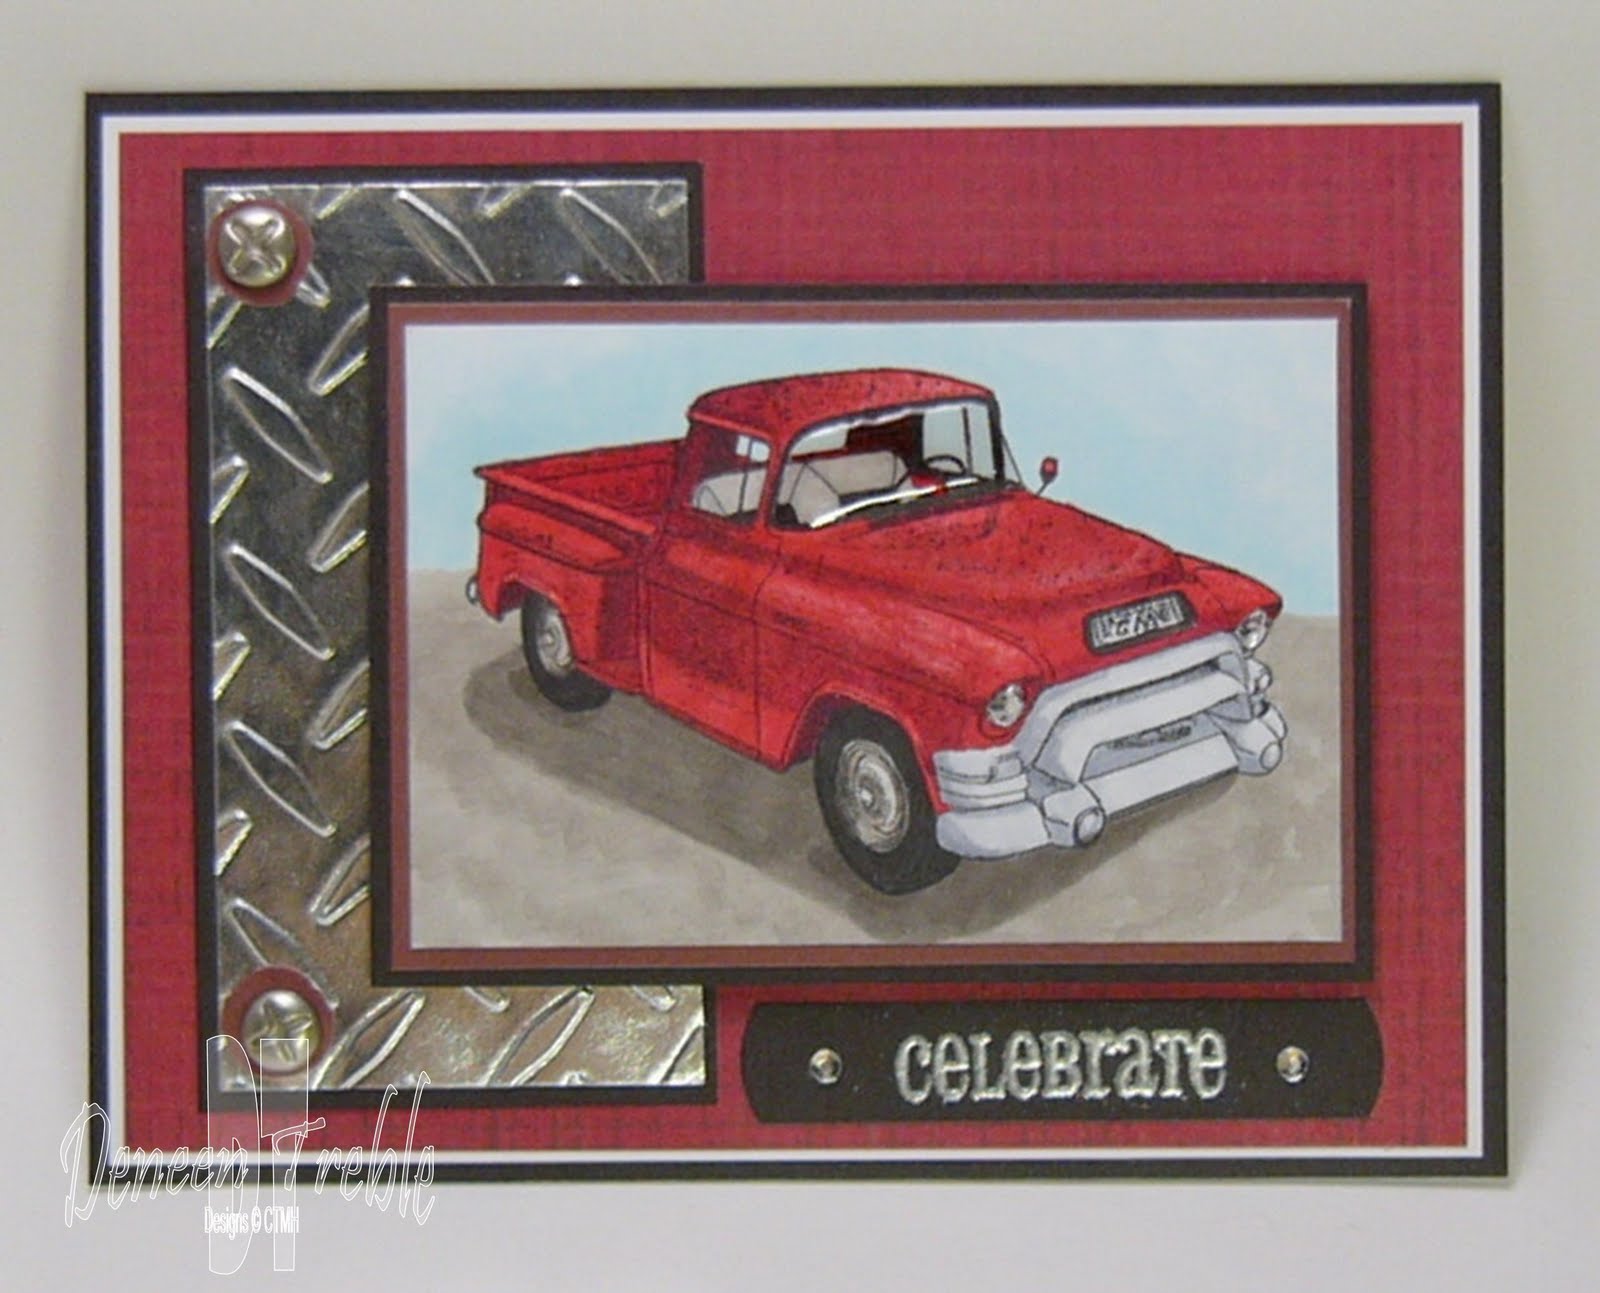
Here's the card I created for the challenge. So, "Where's the fun fold?" you ask. Well, I'm not gonna tell ya.....just yet that is:) First I want to introduce a new CTMH stamp set - Circle of Love, it includes this beautiful peacock, flourishes and feather, and as you can see, it fits on a standard card size. The patterned paper is from a new Level 2 pack called Magnifique. Gorgeous papers, a must have!! It uses some of the new colours CTMH is releasing. The new colours being introduced are: Gypsy, Pacifica, Sunset, Cotton Candy, Lagoon, Pear, Sky and Smoothie. (The colours retiring are: Clover Meadow, Hydrangea, Orange, Star Spangled Blue, Bubblegum, Citrus Leaf, Ocean, and Watermelon...all are Summer colours)
I added Prisma Glitter to the peacock to give it that sheen...and sometimes less is more...I added it to the feathers, and to where the light would bounce off.
Drumroll please.............................here's the fun fold, on the inside:)
The saying I used is from another new stamp set being released, The Present.
And since I couldn't decide which shape I wanted to use, I made 3 cards with the Labels 4, and 3 cards with Labels 3 ('cause you know me, most the time I make at least 6 cards at a time).
I love how the light illuminates the saying.
Here's a top view of the mechanics of the card.
.

Fun Fold Tutorial

Step 2 is if you would like a mat for the piece that will frame your sentiment/image.
*Don't forget*: Your mat is one size SMALLER than the frame piece.


The first set of peacocks I stamped by sponge daubing ink onto sections of the stamp, and then stamping on CS.

"The first set?" you say. Yep, I went to bed satisfied with the peacocks I stamped...they're very nice, I will use them somewhere...but I when I woke up, I didn't like how they looked on the card. So I tried another method...adding ink with my CTMH Blending Pen.
Recipe: CTMH PP-Magnifique, CTMH CS-White Daisy, Outdoor Denim, Sky & Lagoon, CTMH Ink-Pacifica, Pear, Sky, Lagoon & Black, CTMH SS-Circle of Love & The Present, Nestabilities-Big Scalloped Ovals, Fancy Tags & Labels 4/Labels 3, Martha Stewart Pinking Scallop & Woodland Branch Border Punches, Pearls, Rhinestones, Prisma Glitter, Foam Squares.
Phew, I haven't typed this much in a long time. I hope you enjoyed the information I shared with you today...lots to take in, new product, techniques, and a tutorial.
Be sure to check out what the other members of the DT did for Fun Folds! You can click on their links in my sidebar, or you can pop over to the Heart 2 Heart Challenges Blog. Be sure to join us and post your Fun Fold projects too!!!
Enjoy,
Deneen

Sunday, August 29, 2010

Chat Box Added

Hi everyone, hope you're having a great day! Just wanted to let you know that I added a chat box to my sidebar, so if you have a question about a technique, template or something else I've done, or if you just want to ask me anything, feel free to ask away:)

Have fun chatting,
Deneen

Friday, August 27, 2010

LIVE CTMH Classes with New Product!!

Now who doesn't love to learn new things, and see NEW CTMH product!!
.
Tresa Black is an amazing CTMH Consultant and she is co-hosting an event on ustream, tomorrow--Sat. Aug. 28th. (Ustream is like utube, but has the option to show things LIVE, check out some of her past shows HERE.) She has assembled an amazing line-up of CTMH artists to showcase new CTMH products in a 9 hour marathon of live classes.
.
It's all live on her ustream channel, beginning at 9 am pacific. (10 am mountain, 11 am central, 12 noon eastern). Classes will be held on the hour. Each teacher will demonstate a project using a new product from the Autumn/winter catalog.
.
If you miss any of the shows, they will be recorded for later viewing. If you can join live, you'll be able to chat with other viewers and the teacher during the vent (chat is not saved, so you need to attend the live show to experience the "chat room party!") To join the chat, you need a ustream account. It's free and take just a moment to set up.
.
CUOL sm
You can click on the badge above to take you there too!
.
I can't wait for tomorrow!
Deneen

Wednesday, August 25, 2010

1955 GMC Truck, for the Guys!

Welcome here!! This card has a looonnngggg history, which I'll try to make short:) I saw THIS card on Vicki's blog back in January, but I didn't have the same stamp set, so I put the idea on the backburner ('Cause ya know, guy cards are hard to come by). In April, I saw this GMC Truck at the LSS, but wasn't sure if I would use it. Well, when I finally decide I NEEDED it, it was gone!! In the meantime the LSS had a Garage Sale in July and I found this paper...with this card in mind. The truck came in shortly after, and VOILA!!! I finally finished my card that began in January. Phew, what a trip, but definitely worth the wait.
.
Card Size: 4.25" x 5.5"
.
The paper is a deeper red IRL, not sure why it looks a little washed out. I coloured the truck with Copics, and added CTMH Liquid Glass to the windshield and headlights. I used Aluminum Duct Tape for the 'metal' piece (sent through the Cuttlebug with the Diamond Plate EF). I finished the card off by silver embossing 'Celebrate'.
.
Here's the Aluminum Duct Tape (found at the hardware store) being shiny. I found if I attached the Duct Tape to CS, and then sent it through the Cuttlebug, it holds it shape better, than if you just sent the Duct Tape through the Cuttlebug on its own.
.
Here's what a roll looks like, if you haven't seen it before. It already has adhesive on it, you just peel off the backing and stick it where you want.
.

.
Recipe: Patterned Paper-?, CTMH CS-White Daisy, Black & Garnet, CTMH Ink-Black, CTMH SS-Say It In Style, Cornish Heritage Farms-1955 GMC Truck, VersaMark, Silver EP, Cuttlebug Diamond Plate EF, Aluminum Duct Tape, Rhinestones, Brads, Foam Squares, Liquid Glass, Copic Spica-Clear, Copics-R27, R46, W3, W5, W7, C00, C3, BG0000, O.
.
Enjoy,
Deneen

Monday, August 23, 2010

A Guy Card with Sewing

This week it's a Sewing Challenge on Heart 2 Heart Challenges. Your project must include sewing on it. I wanted to try out X-Treme, and I could picture the loud noise being zigzags...so I added them by sewing white thread on Black CS. I also used a zigzag stitch around the edge of the card...to continue with the loud noise theme goin' on:)
.
Card Size: 4.25" x 5.5"
.
For the word 'X-Treme', I inked it up with the lightest colour first Sky (yes!!! it's a new CTMH colour available Sept 1st), without stamping the colour off, I then inked my stamp with Pacifica (yup! another new colour), and then added Black ink to the bottom, I then stamped it onto my White Daisy CS.
.
Recipe: CTMH PP-Sweet Home, CTMH CS-Garnet, Black & White Daisy, CTMH Ink-Pacifica, Sky & Black, CTMH SS-X-Treme, Aluminum Duct Tape, Foam Squares, Cuttlebug Diamond Plate EF, Black Brads.
.
Why don't you join us this week at H2H Challenges and create a card or other project that has sewing on it. Just post it to your blog and then go to the H2H blog and add your link. Be sure to check out what the other DT Members did with this challenge!...their links are on my sidebar, or you can go to the Heart 2 Heart blog to check them out.
.
Enjoy,
Deneen

Monday, August 16, 2010

4-Drawer Easel Card for H2H

It's challenge time again on Heart 2 Heart Challenges. This week the challenge is Back To School...you are to create anything that makes you think of back to school. I created a 4 Drawer Easel Card. It showcases a calendar, and the drawers could hold paper clips, rubber bands etc. It would make a great teacher's gift!
.
I found the instructions HERE, on Ink Something 2 with Kristine. But you know me, I changed things a bit from her instructions...she made origami drawers, and I didn't want to waste that much paper, so I came up with slightly different measurements to accomodate that. I also changed the configuration of the drawers. My tutorial is towards the end of the post!

If you can believe it, I hadn't used my Cherry-O papers yet, lol. I guess I was waiting for just the right project. And this was it!
.


As I was embellishing the Easel Card, I discovered that the some of the Spring Blossom Just Blooms make great 'cherries'.
.


Recipe: CTMH PP-Cherry-O, CTMH CS-Chocolate, Tulip & Colonial White, CTMH Ink-Black, Garden Green, Chocolate & Tulip, CTMH SS-Moments In Time & Live Inspired, Nestabilities-Labels 1, Labels 4 and Fancy Tags, Cuttlebug Vintage Die Cut, Martha Stewart Double Loops Border & Corner Punch, Red Organdy Ribbon, CTMH Just Blooms Flowers, CTMH Chocolate Bigger Brads, Foam Squares, Rhinestones.
.
4-Drawer Easel Card Tutorial
.
The first few steps show how I make the drawers.


.
The next step is how to make the 'wrappers', the piece that will hold the drawer.


.
Be sure to check out the other Back to School examples by the H2H DT, you can find their links on my sidebar, or you can check them out over on the H2H blog!
.
I'd love to see what Back to School means to you! Be sure to post your creation to your blog or other online gallery, and then head over to H2H to add your link so that we can all see it! You could even be choosen for the Friday Five.
.
Enjoy,
Deneen

Friday, August 13, 2010

Bridal Shower Card

Well, I was loving the Graduation Card I made for my niece, and wanted to try one using all creams, or all white. I had a Bridal Shower to go to, so it was the perfect time to try the cream version out.
.Card Size: 4" x 6"
.Bridal Shower Card
.
After I started the card, I realized I needed to make a little pocket to hold the cash, but I didn't want to make it a large part of the card. I came up with a little decorative pocket for the corner.
Bridal Shower Card inside
The Nestabilities I used were: Curved Rectangle, Fleur De Lis, Circle, and Floral Accents.
.
Hope you have a great weekend!!
Deneen

Monday, August 09, 2010

Sketch Challenge on H2H

And a Happy Monday to you all! Welcome here:) I hope everyone is having a great summer. Time seems to be flying by...just think, 1 more month and sch.....sch......school starts, gulp. That means back to work for me. I really enjoy the time off, but I also look forward to the school routine again. I love having the kids at home, but on days when they are getting on each other's last nerve, I can't wait for school, lol:) Well, enough about me, on to what you came for.
.
This week the on Heart 2 Heart Challenges, it's a Sketch Challenge. Here's the Sketch:
And here's my card based on the sketch. I stayed almost true to the sketch, I added a bow instead of another circle. But that's what a sketch is for, a starting place to get your creative mojo going:) I had every intention of adding another circle, but then realized it would take away from my focal point, so I added the softness of a bow. I used CTMH's Blending Pen to add the darker colour to the flower.
Recipe: CTMH PP-Veranda, CTMH CS-Colonial White & Cocoa, CTMH Ink-Moonstruck, Chocolate, Desert Sand, Black & Honey, CTMH SS- You Are Beautiful & Say It In Style, Martha Stewart Layered Arches Border Punch, Nestabilities-Circle, Floral Accents & Labels Eight, Copic-C00, CTMH Satin Edge Colonial White Organdy Ribbon, Scor-It, Foam Squares, Pearls.
.
I almost forgot to mention that I used Nestabilities Labels Eight to add the fancy edge along the bottom. (Don't send your CS all the way through, you just send the very edge in, and then reverse it, hope that makes sense:))
.
Be sure to check out the great artwork based on this sketch by the other Design Team Members (the links are in my sidebar) or you can pop on over to the H2H Blog.
.
The challenge, if you should choose to accept it:
*Use the sketch as a jumping point for your artwork--you can flip it, and adjust it to suit you--we just need to be able to tell your artwork was based on the sketch.
.
Then don't forget to upload your artwork to your blog or other online gallery and then head over to H2H to leave your link so we can view your artwork. You could even be in the next Friday Five!!!
.
Enjoy,
Deneen

Sunday, August 08, 2010

Washer Pendant Necklaces Clasp & Tutorial

Many have asked how I have finished off my Washer Pendant Necklaces...which I shared in an earlier post, you can find it HERE. So in this post I will share with you how I finish off mine, here's a shot of one. I really like the ability to lengthen or shorten the Pendant...because we all have different tastes.
.
.
I use Satin/Nylon Cording, and cut it no shorter than 36"! Or you won't be able to get it over your head...yup, found out the hard way, luckily I had only done 3:)
.
For the purpose of the tutorial I used 2 different colours so you can see what I am doing:)
.


Cut the tails short, and finish it off with some Liquid Glass.
.
And that's it!! Quick and painless. (Except for the waiting of the Liquid Glass to dry, lol)
.
Enjoy,
Deneen

Friday, August 06, 2010

Purses Galore!!

Lisa Stenz had the cutest purse on her blog and I knew I had to give them a try...you can see her's HERE. The template is by Bridget Louw and can be found HERE. (the template is a little rough..and the perfectionist in me re-drew it, so that it would be symmetrical) There's a few Hints and things I did different than Bridget's instructions...I'll add them to the bottom of the post.
.
I showed Sharon at The Scrapbook Cottage here in town, and she wanted me to make some samples up, and here they are!!

Isn't it one of the cutest things you've seen?? Be sure to go thank Lisa Stenz for making one...so that I could scraplift it:) The 'buckle' is made from Aluminum Duct Tape. (I cover a piece of scrap CS with the duct tape, and then cut out my buckles.)
.
The only thing I didn't have on hand was some Velcro for the pocket closure, otherwise the pocket will lay more flat.
I added Stickles to the purse front:


Instructions:
To print the Template to the correct size, I copied it to Publisher, then enlarged it and cropped it so that the right half of the purse printed. (see photo) Once that side printed, I hit the 'undo' button and then cropped it again, but this time the left half of the purse (with some of the middle section so that you can overlap the 2 pieces). Enlarge and print the 'pocket' too.

To cut the template out, you need to cut inside the black lines. Once all 3 pieces are cut out, line up the 2 purse pieces and glue together so that you have 1 purse piece. Transfer all score lines to your template, but don't score your template.


Your templates are ready to use.
.
Trace the templates onto CS (the purse piece will take up a full 12x12 piece). Cut out, again inside the black lines, then score and fold your CS piece, as indicated by the template. (If you line up the one side of the base, you should be able to score the three places--tab, base, tab--without moving your ruler, or your CS on the ScorPal/Scor-It.)
.
Buckles: 1" x 1.25" (4)--I cut 2 slits with my X-acto knife, one near the top and one near the bottom, so that I can slide the handle through.
Handles: I cut mine 6/8" rather than 7/8" like Bridget did. 6/8" x 12" (2)
.
I found it better to trace your CS purse front onto your patterned paper (rather than from the template), that way if you made any cutting errors or cut slightly 'off' the template lines, your patterned piece will still fit the purse front....hope this makes sense...once you put one together it will make more sense.
.
Have fun making purses...now I'm off to make some from CTMH papers!!!
.
Enjoy,
Deneen
.
I almost forgot about the Mini-Purse that I included as Blog Candy. (I printed the template at the wrong size and instead of throwing it away, I thought I'd be able to use it to make a Mini-Purse)
.
It's the perfect size for the Washer Pendants!!

LinkWithin

Related Posts with Thumbnails